Transform Your Google Slides: Advanced Techniques for a Polished Presentation
Mastering Design Fundamentals for Professional Impact
I've spent years refining my presentation skills, and I'm excited to share how you can elevate your Google Slides from basic to breathtaking. In this guide, we'll explore advanced techniques that will transform your presentations into professional, engaging visual experiences that captivate your audience and effectively communicate your message.
Design Fundamentals for Professional Impact
I've found that mastering design fundamentals is the cornerstone of creating professional Google Slides presentations. When I first started creating presentations, I often struggled with cluttered slides and inconsistent design elements. Now, I understand that visual hierarchy and consistency are key to guiding my audience through my content effectively.
Creating Visual Hierarchy
To establish effective visual hierarchy in my presentations, I vary font sizes and weights strategically. I make headings larger and bolder than body text to ensure key points stand out immediately. This simple technique helps my audience quickly grasp the structure of information on each slide.
I also make sure to implement consistent alignment, spacing, and indentation across all slides. This attention to detail creates a refined appearance that subtly communicates professionalism. When elements are properly aligned, the audience can focus on the content rather than being distracted by visual inconsistencies.
The Power of Master Slide
One of the most valuable techniques I've discovered is utilizing the Master Slide feature to maintain design coherence. This powerful tool allows me to make global design changes that apply consistently throughout my presentation, saving time and ensuring a cohesive look.
                        flowchart TD
                            A[Master Slide] --> B[Theme Slide]
                            B --> C[Layout 1: Title Slide]
                            B --> D[Layout 2: Title and Content]
                            B --> E[Layout 3: Section Header]
                            B --> F[Layout 4: Two Column]
                            C --> G[Individual Slides]
                            D --> G
                            E --> G
                            F --> G
                            style A fill:#FF8000,stroke:#FF8000,color:white
                            style B fill:#FF9933,stroke:#FF9933,color:white
                            style C fill:#FFB366,stroke:#FFB366,color:black
                            style D fill:#FFB366,stroke:#FFB366,color:black
                            style E fill:#FFB366,stroke:#FFB366,color:black
                            style F fill:#FFB366,stroke:#FFB366,color:black
                            style G fill:#FFCC99,stroke:#FFCC99,color:black
The Master Slide hierarchy in Google Slides allows for consistent design application across your presentation.
Color Strategy and Visual Harmony
I've learned that a thoughtful color strategy can dramatically improve the impact of my presentations. When selecting colors, I choose complementary schemes that align with my brand or message. This creates visual harmony that feels intentional and professional.

Using Google Slides presentations tips, I've discovered that color psychology can be a powerful tool. For example, blue evokes trust and professionalism, while orange stimulates enthusiasm and creativity. I strategically apply these colors based on the emotional response I want to elicit from my audience.
For unique branding opportunities, I create custom color palettes instead of relying solely on Google Slides' built-in themes. This allows me to perfectly match my organization's brand colors or create a distinctive visual identity for my presentation.
When working with complex presentation structures, I've found that PageOn.ai's AI Blocks feature helps me organize elements without struggling with layout complexities. This tool allows me to focus on content while ensuring my design remains clean and professional.
Advanced Visual Enhancement Techniques
Once I've established solid design fundamentals, I enhance my presentations with advanced visual techniques that add depth and interest. These methods help my slides stand out while maintaining a professional appearance.
Adding Depth with Drop Shadows
I often experiment with drop shadows to add dimension to text and objects. This simple technique creates a subtle 3D effect that makes elements appear to float above the slide background, adding visual interest without being distracting.
To add drop shadows in Google Slides, I highlight the text or object, go to Format Options, and enable the Drop Shadow box. Then I adjust the transparency, angle, distance, and blur settings to achieve the perfect effect for my presentation style.
Creative Text Effects
For important sections or title slides, I create eye-catching neon titles using Word Art and gradient colors. This technique draws attention to key parts of my presentation while adding a modern, dynamic feel.
When working with Google Slides tricks for text effects, I've discovered that combining gradients with subtle animations creates particularly engaging titles that capture audience attention immediately.
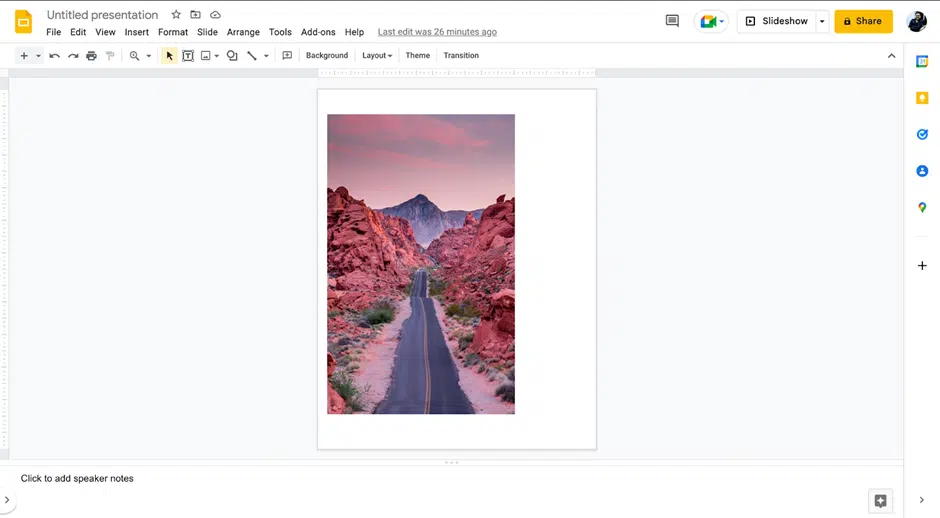
Image Masking for Visual Interest
I've mastered image masking to transform standard rectangular images into various shapes. This technique adds visual interest and helps integrate images more seamlessly with my overall design.
                        flowchart LR
                            A[Select Image] --> B[Right-click]
                            B --> C[Select 'Mask Image']
                            C --> D[Choose Shape]
                            D --> E[Adjust as needed]
                            E --> F[Apply]
                            style A fill:#FF8000,stroke:#FF8000,color:white
                            style F fill:#FF8000,stroke:#FF8000,color:white
By combining image masking with strategic placement and drop shadows, I create professional-looking slides that feel intentionally designed rather than hastily assembled.
Working with High-Quality Visuals
I've found that high-quality visuals are essential for creating professional presentations. I source premium images directly from Google Images without leaving Slides by going to Insert > Image > Search the web. This seamless integration saves time while ensuring I have access to excellent visual resources.
When working with images, I apply proper formatting techniques to maintain resolution quality. I avoid stretching images disproportionately and use high-resolution sources whenever possible to prevent pixelation during presentations.
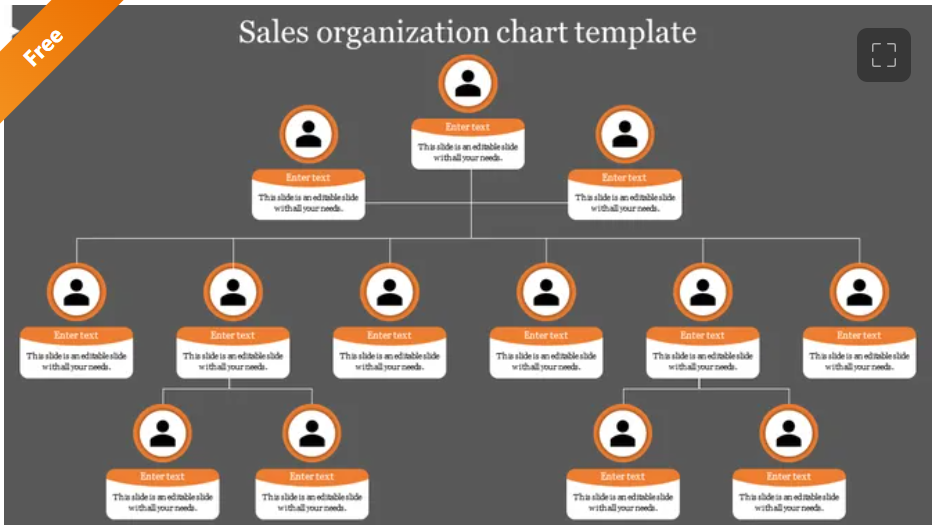
For complex data, I create custom diagrams and infographics rather than relying on dense text. This approach makes information more digestible and engaging for my audience. I've found that AI Google Slides enhancements can help generate these visual elements quickly and professionally.
PageOn.ai's Deep Search functionality has been invaluable for discovering and integrating relevant visuals seamlessly. This tool helps me find images that perfectly match my presentation's theme and color scheme, creating a cohesive visual experience.
Leveraging the Power of Slide Master
I consider the Slide Master feature to be one of Google Slides' most powerful tools for creating professional presentations. It gives me global design control and ensures consistency across all my slides.
Accessing and Navigating Slide Master
To access Slide Master view, I go to View > Master or Slide > Edit Master. This opens a powerful interface where I can make global design changes that affect my entire presentation.
Within the Master view, I can modify default text styles, placeholders, and backgrounds at the master level. Any changes I make here will be reflected across all slides that use the affected layouts, saving me significant time and ensuring consistency.
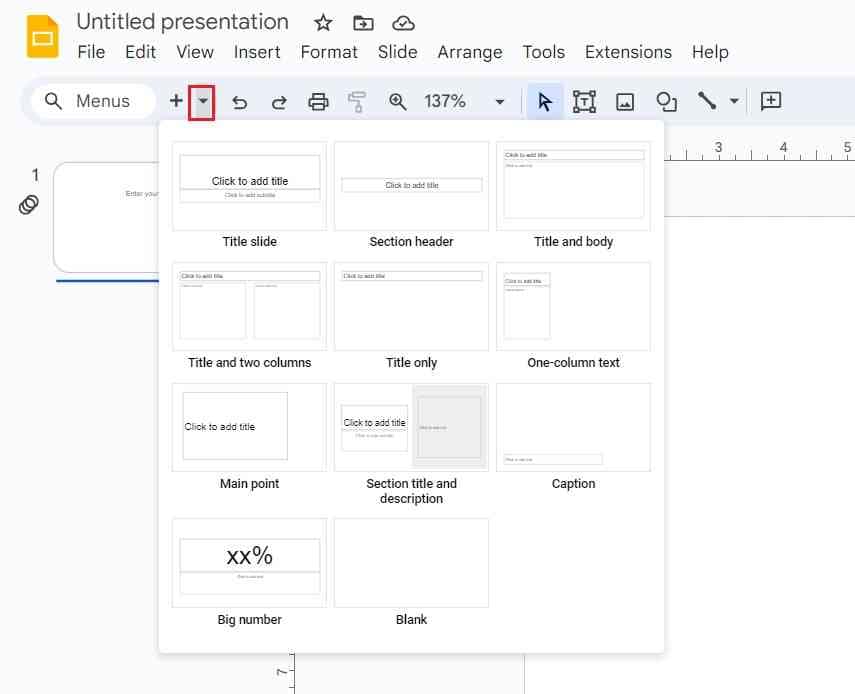
Custom Layout Creation
One of my favorite advanced techniques is creating specialized layouts for different content types. For example, I design specific layouts for data slides, quote slides, and comparison slides. This approach ensures that each type of content has an optimized presentation format.
To create a new layout in Slide Master view, I right-click on an existing layout thumbnail and select "Duplicate layout" or click the "Insert layout" button. Then I customize the new layout by adding, removing, or repositioning elements as needed.
Consistent Header and Footer Elements
I develop consistent header and footer elements across all slides to create a professional, branded appearance. In Slide Master view, I add my logo, presentation title, page numbers, or other consistent elements that should appear on every slide.
For Google Slides interactive presentations, I sometimes include navigation elements in the master footer that help me move between sections quickly during delivery.
When working with complex presentation concepts, I use PageOn.ai's AI Blocks feature to transform abstract ideas into clear visual structures. This tool helps me visualize relationships between concepts and create organized, logical layouts that guide my audience through complex information.
Interactive Elements and Engagement Features
To truly captivate my audience, I incorporate interactive elements that transform my presentations from passive experiences into engaging, dynamic sessions. These features help maintain attention and improve information retention.
Non-Linear Navigation with Hyperlinks
I incorporate hyperlinks for non-linear navigation through my presentations. This allows me to create interactive menus and jump to specific sections based on audience interest or questions.
                        flowchart TD
                            A[Main Menu] --> B[Section 1]
                            A --> C[Section 2]
                            A --> D[Section 3]
                            B --> B1[Topic 1.1]
                            B --> B2[Topic 1.2]
                            C --> C1[Topic 2.1]
                            C --> C2[Topic 2.2]
                            D --> D1[Topic 3.1]
                            D --> D2[Topic 3.2]
                            B1 & B2 & C1 & C2 & D1 & D2 -.-> A
                            style A fill:#FF8000,stroke:#FF8000,color:white
To create hyperlinks, I select the text or object I want to make clickable, click Insert > Link, and then choose the destination slide or external URL. This technique is especially useful for interactive Google Slides presentations where audience participation is important.
Embedded Media for Enhanced Engagement
I embed videos and other media to enhance engagement and illustrate key points. This multimedia approach helps break up text-heavy content and provides visual demonstrations that improve understanding.

To embed a YouTube video, I go to Insert > Video and then search for the video or paste its URL. I can control when the video starts and ends, which is perfect for highlighting specific segments without showing the entire video.
Advanced Animation Strategies
I implement sequential animations to guide audience attention through complex information. By revealing content in a logical order, I can control the narrative flow and prevent information overload.
For professional presentations, I use subtle animations like fade-ins and dissolves rather than flashy effects that might distract from my content. I also maintain consistent animation timing for professional pacing throughout the presentation.
I've found that motion paths can be particularly effective for illustrating processes or relationships between elements. This animation type allows objects to move along a specified path, creating dynamic visualizations of workflows or connections.
PageOn.ai's Agentic capabilities have transformed how I approach interactivity in my presentations. This powerful feature helps me convert static slides into interactive experiences that respond to audience needs and interests, creating a more dynamic and engaging presentation.
Technical Optimization and Delivery Enhancement
Creating a visually stunning presentation is only part of the equation. I also focus on technical optimization to ensure smooth delivery and accessibility for all audience members.
Mastering Presenter View
I've mastered presenter view to deliver my presentations more effectively. This tool shows my slides on the presentation screen while displaying my notes, upcoming slides, and a timer on my device.

To access presenter view, I click the "Present" button and select "Presenter view." I make sure to add comprehensive speaker notes that guide my delivery without being visible to the audience.
File Size Optimization
I optimize file size for smooth performance during presentations, especially when sharing my screen in virtual meetings. Large files can cause lag or loading issues that disrupt the flow of my delivery.
To reduce file size, I compress images before uploading them, link to videos rather than embedding them when possible, and use simpler animations. These techniques help ensure my presentation runs smoothly on any device.
Creating Accessible Presentations
I create accessible presentations with proper heading structures and alt text for images. This ensures that my content is available to all audience members, including those using screen readers or other assistive technologies.
To add alt text to an image in Google Slides, I right-click the image, select "Alt text," and enter a descriptive caption. This simple step makes my presentations more inclusive and accessible.
Cross-Platform Considerations
I ensure font compatibility across different devices and operating systems by sticking to common fonts or using Google Fonts, which are consistently rendered across platforms. This prevents formatting issues when my presentation is viewed on different devices.
I also test my presentations on multiple screen sizes and resolutions to ensure they look good whether displayed on a large projector or a small laptop screen. This attention to detail helps maintain a professional appearance in any presentation environment.
                        flowchart TD
                            A[Create Presentation] --> B{Test on Multiple Platforms}
                            B --> C[Desktop/Laptop]
                            B --> D[Tablet]
                            B --> E[Mobile]
                            B --> F[Projector]
                            C & D & E & F --> G{Issues Found?}
                            G -- Yes --> H[Make Adjustments]
                            H --> B
                            G -- No --> I[Presentation Ready]
                            style A fill:#FF8000,stroke:#FF8000,color:white
                            style I fill:#FF8000,stroke:#FF8000,color:white
PageOn.ai has been invaluable for generating comprehensive speaker notes that align perfectly with my visual content. The tool analyzes my slides and suggests talking points that complement the visual elements, helping me deliver a more cohesive and engaging presentation.
From Basic to Advanced: Practical Implementation
Putting all these techniques into practice requires a systematic approach. I've developed a workflow that helps me transform standard templates into customized, professional presentations efficiently.
Step-by-Step Workflow
My workflow for creating professional Google Slides presentations follows a logical progression from planning to final delivery.
                        flowchart TD
                            A[Plan Content Structure] --> B[Select/Create Template]
                            B --> C[Customize Master Slides]
                            C --> D[Add Content to Slides]
                            D --> E[Apply Visual Enhancements]
                            E --> F[Add Interactive Elements]
                            F --> G[Optimize for Delivery]
                            G --> H[Review and Refine]
                            H --> I[Practice Delivery]
                            I --> J[Present]
                            style A fill:#FFEECC,stroke:#FF8000
                            style B fill:#FFEECC,stroke:#FF8000
                            style C fill:#FFEECC,stroke:#FF8000
                            style D fill:#FFEECC,stroke:#FF8000
                            style E fill:#FFEECC,stroke:#FF8000
                            style F fill:#FFEECC,stroke:#FF8000
                            style G fill:#FFEECC,stroke:#FF8000
                            style H fill:#FFEECC,stroke:#FF8000
                            style I fill:#FFEECC,stroke:#FF8000
                            style J fill:#FF8000,stroke:#FF8000,color:white
This systematic approach ensures that I address all aspects of presentation design in a logical order, building from a solid foundation to refined details.
Time-Saving Shortcuts
I implement time-saving shortcuts and productivity hacks specific to Google Slides. For example, I use Ctrl+K to add links quickly, Alt+Shift+Arrow keys to duplicate and move objects with precision, and Ctrl+Alt+M to add new slides.
| Shortcut | Function | Time Saved |
|---|---|---|
| Ctrl+K | Insert hyperlink | 5-10 seconds per link |
| Ctrl+Alt+M | Insert new slide | 3-5 seconds per slide |
| Alt+Shift+Arrow | Duplicate and move objects | 10-15 seconds per operation |
| Ctrl+Shift+V | Paste without formatting | 5-30 seconds per paste |
| Ctrl+Alt+Shift+7 | Align objects horizontally | 5-10 seconds per alignment |
Building a Reusable Component Library
I develop a personal library of reusable elements and design components that I can quickly insert into new presentations. This includes custom diagrams, branded graphics, and formatted text boxes that maintain my visual style across presentations.
To create this library, I save particularly successful slides or elements to a "components" presentation that I can reference and copy from when creating new content. This approach saves significant time while maintaining design consistency.
Before-and-After Transformation
The impact of these advanced techniques is best illustrated through before-and-after examples. Below is a comparison showing how applying these principles can transform a basic slide into a professional, polished presentation element.

With PageOn.ai's comprehensive toolset, I can transform my initial presentation concept into polished visual reality much more efficiently. The platform's AI-driven capabilities help me generate layout variations, suggest optimal design elements, and create visually cohesive slides without spending hours on manual design work.
Transform Your Visual Expressions with PageOn.ai
Ready to take your Google Slides presentations to the next level? PageOn.ai offers powerful AI-driven tools that help you create stunning visual content without the struggle. From intelligent layout suggestions to seamless visual integration, our platform makes professional presentation design accessible to everyone.
Start Creating with PageOn.ai TodayConclusion: Elevate Your Presentation Game
As I've demonstrated throughout this guide, transforming your Google Slides presentations from basic to professional doesn't require advanced design skills—just the right techniques and tools. By mastering design fundamentals, implementing visual enhancements, leveraging Slide Master, adding interactive elements, and optimizing for delivery, you can create presentations that truly stand out.
Remember that great presentations balance visual appeal with clear communication. All the techniques I've shared are meant to enhance your message, not overshadow it. When applied thoughtfully, these advanced techniques will help you create Google Slides presentations that are both beautiful and effective.
For those times when you need additional support or want to streamline the process even further, PageOn.ai offers innovative tools that complement Google Slides perfectly. From AI-powered layout suggestions to seamless visual integration, PageOn.ai can help you create professional presentations in a fraction of the time.
I encourage you to experiment with these techniques in your next presentation. Start with one or two new approaches and gradually incorporate more as you become comfortable. With practice and the right tools, you'll be creating stunning, professional presentations that engage your audience and effectively communicate your message.
You Might Also Like
Mastering Workplace Communication with International Phonetic Alphabet (IPA) - Visual Guide
Discover how the International Phonetic Alphabet transforms workplace communication. Learn visual approaches to implement IPA for clearer global business interactions.
Mastering the American Accent: Essential Features for Global Professional Success
Discover key American accent features for global professionals with visual guides to vowel pronunciation, rhythm patterns, and industry-specific applications for career advancement.
From What to Why in Business Presentations: Purpose-Driven Storytelling Strategy
Transform your business presentations from data-heavy information delivery to purpose-driven storytelling that engages audiences and drives decisions with these expert strategies.
The Art of Instant Connection: Crafting Opening Strategies That Captivate Any Audience
Discover powerful opening strategies that create instant audience connection. Learn visual storytelling, interactive techniques, and data visualization methods to captivate any audience from the start.