Mastering Browser Automation with Playwright
A Complete Guide for QA Engineers
Introduction to Playwright for Browser Control
Playwright has emerged as a powerful framework for browser automation, offering QA engineers unprecedented control over web testing scenarios. Unlike traditional automation tools, Playwright provides robust cross-browser support, powerful selectors, and intelligent auto-waiting mechanisms that significantly reduce test flakiness.
Understanding Playwright's Architecture
flowchart TB
    Client[Test Scripts] -->|Commands| Protocol[Browser Protocol]
    Protocol --> Browsers
    Browsers --> Chrome["Chromium\n(Chrome, Edge)"]
    Browsers --> Firefox
    Browsers --> WebKit["WebKit\n(Safari)"]
    Protocol -->|Auto-Wait| ElementReady[Element Ready]
    Protocol -->|Events| Results[Test Results]
Playwright's architecture is designed to provide consistent behavior across all major browser engines. This unified approach means you can write tests once and run them everywhere, dramatically reducing the maintenance burden compared to browser-specific testing solutions.
Key Advantages Over Legacy Frameworks
- True cross-browser testing with a single API for Chromium, Firefox, and WebKit
- Auto-waiting for elements to be ready before actions, reducing flaky tests
- Network interception for mocking API responses and testing edge cases
- Browser contexts for perfect isolation between test cases
- Powerful debugging with the Trace Viewer for detailed insights into test failures
Enabling True End-to-End Testing
With Playwright, QA engineers can create comprehensive test suites that validate the entire user journey, from UI interactions to API calls and database operations. This holistic approach ensures that your application works correctly at every level, providing confidence in your releases.
Setting Up Your Playwright Environment
Environment Prerequisites
npm init playwright@latest
yarn create playwright
The installation process will guide you through setting up a new Playwright project, installing browser binaries, and creating a basic configuration. By default, it installs Chromium, Firefox, and WebKit browsers, along with the necessary dependencies.
Project Configuration Best Practices
A well-structured Playwright project makes maintenance easier and improves collaboration. Here's a recommended folder structure for scalable test projects:
flowchart TD
    Project[Project Root] --> Config[playwright.config.js]
    Project --> Tests[tests/]
    Project --> Pages[pages/]
    Project --> Utils[utils/]
    Project --> Fixtures[fixtures/]
    Tests --> E2E[e2e/]
    Tests --> API[api/]
    Tests --> Visual[visual/]
    Pages --> Components[components/]
The playwright.config.js file is the heart of your Playwright setup, allowing you to configure browsers, test runners, reporters, and more. Here's an example configuration with best practices:
// playwright.config.js
const { defineConfig } = require('@playwright/test');
module.exports = defineConfig({
  testDir: './tests',
  timeout: 30000,
  expect: {
    timeout: 5000
  },
  fullyParallel: true,
  forbidOnly: !!process.env.CI,
  retries: process.env.CI ? 2 : 0,
  workers: process.env.CI ? 1 : undefined,
  reporter: [
    ['html'],
    ['junit', { outputFile: 'results.xml' }]
  ],
  use: {
    baseURL: 'https://example.com',
    trace: 'on-first-retry',
    screenshot: 'only-on-failure',
    video: 'retain-on-failure',
  },
  projects: [
    {
      name: 'chromium',
      use: { browserName: 'chromium' },
    },
    {
      name: 'firefox',
      use: { browserName: 'firefox' },
    },
    {
      name: 'webkit',
      use: { browserName: 'webkit' },
    },
  ],
});
IDE Setup and Extensions
Enhance your development experience with these recommended IDE extensions for Playwright:
- Playwright Test for VS Code - Official extension with IntelliSense, debugging, and test running capabilities
- ESLint - Enforce coding standards in your test files
- Prettier - Maintain consistent formatting across your test codebase
Core Concepts in Playwright Automation
Browser Contexts and Pages
flowchart TD
    Browser[Browser] --> Context1[Browser Context 1]
    Browser --> Context2[Browser Context 2]
    Context1 --> Page1[Page 1]
    Context1 --> Page2[Page 2]
    Context2 --> Page3[Page 3]
    Context2 --> Page4[Page 4]
In Playwright, the relationship between browsers, contexts, and pages is hierarchical:
- Browser: The actual browser instance (Chromium, Firefox, or WebKit)
- Browser Context: An isolated incognito-like session within a browser
- Page: A single tab within a browser context
This structure provides perfect isolation between test cases, preventing state leakage and ensuring reliable test execution.
Powerful Selector Strategies
Playwright offers multiple ways to locate elements, each with its own strengths:
| Selector Type | Example | Best For |
|---|---|---|
| Text | page.getByText('Submit') | Human-readable, stable selectors |
| Role | page.getByRole('button', { name: 'Submit' }) | Accessibility-first approach |
| Label | page.getByLabel('Password') | Form elements with labels |
| Placeholder | page.getByPlaceholder('Search') | Input fields with placeholders |
| CSS | page.locator('.submit-button') | Specific styling or structure |
| XPath | page.locator('//button[contains(text(),"Submit")]') | Complex hierarchical selection |
Playwright's recommendation is to use user-facing attributes like text, role, and labels whenever possible, as they tend to be more stable than implementation details like CSS classes or XPath.
Intelligent Waiting Mechanisms
One of Playwright's most powerful features is its auto-waiting mechanism, which significantly reduces test flakiness by ensuring elements are ready before interacting with them.
Playwright automatically waits for elements to be:
- Attached to the DOM
- Visible on the page
- Stable (not animating)
- Enabled (not disabled)
- Receivable (not obscured by other elements)
For scenarios where you need custom waiting logic, Playwright provides flexible waiting utilities:
// Wait for a specific condition
await page.waitForSelector('.loaded-indicator');
// Wait for network to be idle
await page.waitForLoadState('networkidle');
// Wait for a function to return true
await page.waitForFunction(() => document.querySelector('.dynamic-content') !== null);
Advanced Automation Techniques
Network Control and Interception
Playwright gives you complete control over network traffic, allowing you to intercept, modify, and mock HTTP requests and responses.
// Mock API response
await page.route('**/api/users', route => {
  route.fulfill({
    status: 200,
    contentType: 'application/json',
    body: JSON.stringify([
      { id: 1, name: 'John Doe' },
      { id: 2, name: 'Jane Smith' }
    ])
  });
});
// Abort requests to analytics
await page.route('**/analytics/**', route => route.abort());
// Modify request headers
await page.route('**/*', route => {
  const headers = route.request().headers();
  headers['X-Custom-Header'] = 'test-value';
  route.continue({ headers });
});
Network interception is particularly useful for testing error scenarios, offline modes, or simulating API responses without relying on backend services.
Authentication Patterns
Handling authentication efficiently is crucial for test performance and maintenance. Playwright offers several approaches:
flowchart TD
    Start[Start Testing] --> NeedAuth{Need Authentication?}
    NeedAuth -->|Yes| AuthMethod{Choose Auth Method}
    NeedAuth -->|No| TestCase[Run Test Case]
    AuthMethod -->|UI Flow| UILogin[Login via UI]
    AuthMethod -->|API| APILogin[Login via API]
    AuthMethod -->|Storage State| LoadState[Load Auth State]
    UILogin --> TestCase
    APILogin --> TestCase
    LoadState --> TestCase
The most efficient approach is to use storage state, which allows you to save and reuse authentication tokens:
// Login once and save the state
const authFile = 'auth.json';
const context = await browser.newContext();
const page = await context.newPage();
await page.goto('https://example.com/login');
await page.fill('#username', 'user');
await page.fill('#password', 'pass');
await page.click('#login');
await page.waitForURL('https://example.com/dashboard');
await context.storageState({ path: authFile });
// Reuse the authentication state in other tests
const authenticatedContext = await browser.newContext({
  storageState: authFile
});
const authenticatedPage = await authenticatedContext.newPage();
await authenticatedPage.goto('https://example.com/protected-area');
// User is already logged in
Visual Testing Integration
Playwright makes it easy to implement visual testing by capturing screenshots and comparing them against baselines.

Here's a basic implementation of visual testing with Playwright:
const { test, expect } = require('@playwright/test');
test('visual comparison', async ({ page }) => {
  await page.goto('https://example.com');
  // Take a screenshot of a specific element
  const screenshot = await page.locator('.hero-section').screenshot();
  // Compare with the baseline (requires expect-playwright plugin)
  expect(screenshot).toMatchSnapshot('hero-section.png');
});
For more advanced visual testing, you can integrate with specialized tools like Percy, Applitools, or use Playwright's built-in snapshot comparison.
Building a Robust Test Framework
Page Object Model Implementation
The Page Object Model (POM) is a design pattern that creates an object repository for web UI elements. It helps improve test maintenance and reduces code duplication.
classDiagram
    class BasePage {
        +page
        +constructor(page)
        +navigate(url)
        +waitForPageLoad()
    }
    class LoginPage {
        +usernameField
        +passwordField
        +loginButton
        +login(username, password)
        +getErrorMessage()
    }
    class DashboardPage {
        +userGreeting
        +logoutButton
        +menuItems
        +navigateToSection(sectionName)
        +logout()
    }
    BasePage <|-- LoginPage
    BasePage <|-- DashboardPage
Here's an example of implementing the Page Object Model with Playwright:
// pages/BasePage.js
class BasePage {
  constructor(page) {
    this.page = page;
  }
  async navigate(url) {
    await this.page.goto(url);
  }
  async waitForPageLoad() {
    await this.page.waitForLoadState('networkidle');
  }
}
// pages/LoginPage.js
class LoginPage extends BasePage {
  constructor(page) {
    super(page);
    this.usernameField = page.locator('#username');
    this.passwordField = page.locator('#password');
    this.loginButton = page.locator('#login');
    this.errorMessage = page.locator('.error-message');
  }
  async login(username, password) {
    await this.usernameField.fill(username);
    await this.passwordField.fill(password);
    await this.loginButton.click();
  }
  async getErrorMessage() {
    return await this.errorMessage.textContent();
  }
}
// tests/login.spec.js
const { test, expect } = require('@playwright/test');
const { LoginPage } = require('../pages/LoginPage');
test('successful login', async ({ page }) => {
  const loginPage = new LoginPage(page);
  await loginPage.navigate('https://example.com/login');
  await loginPage.login('validUser', 'validPassword');
  await expect(page).toHaveURL(/dashboard/);
});
Test Data Management
Effective test data management is critical for creating reliable and maintainable tests. Here are some strategies for handling test data in Playwright:
Common approaches include:
- Data files: Store test data in JSON, CSV, or YAML files
- Fixtures: Use Playwright's built-in fixture mechanism to provide test data
- Data generation: Use libraries like Faker.js to generate realistic test data
- API seeding: Create test data via API calls before UI tests run
Here's an example using Playwright's test fixtures for data-driven testing:
// fixtures.js
const base = require('@playwright/test');
const { faker } = require('@faker-js/faker');
exports.test = base.test.extend({
  userData: async ({}, use) => {
    const user = {
      username: faker.internet.userName(),
      email: faker.internet.email(),
      password: faker.internet.password(),
      firstName: faker.person.firstName(),
      lastName: faker.person.lastName()
    };
    await use(user);
  }
});
// user-registration.spec.js
const { test } = require('./fixtures');
test('register new user', async ({ page, userData }) => {
  await page.goto('/register');
  await page.fill('#username', userData.username);
  await page.fill('#email', userData.email);
  await page.fill('#password', userData.password);
  await page.fill('#first-name', userData.firstName);
  await page.fill('#last-name', userData.lastName);
  await page.click('#register-button');
  await expect(page).toHaveURL('/welcome');
});
Error Handling and Recovery
Robust error handling is essential for reliable test automation. Playwright provides several mechanisms for dealing with errors and recovering from failures.
// Try-catch for handling expected errors
test('handle expected errors', async ({ page }) => {
  await page.goto('/form');
  await page.click('#submit-button');
  try {
    await expect(page.locator('.success-message')).toBeVisible({ timeout: 2000 });
  } catch (e) {
    // Handle the case where success message doesn't appear
    const errorMessage = await page.locator('.error-message').textContent();
    expect(errorMessage).toContain('Please fill all required fields');
  }
});
// Soft assertions for continuing after failures
test('soft assertions', async ({ page }) => {
  await page.goto('/dashboard');
  // Test will continue even if this assertion fails
  await expect.soft(page.locator('#user-greeting')).toContainText('Welcome');
  // This will still execute regardless of the previous assertion
  await page.click('#settings-button');
  await expect(page).toHaveURL(/settings/);
});
// Retrying flaky tests with annotations
test.describe('retry flaky tests', () => {
  test.beforeEach(async ({ page }) => {
    await page.goto('/dynamic-content');
  });
  // This test will be retried up to 3 times if it fails
  test('handle flaky dynamic content', { retries: 3 }, async ({ page }) => {
    await page.click('#load-data');
    await expect(page.locator('.data-container')).toContainText('Loaded successfully');
  });
});
For comprehensive error reporting, consider integrating custom error handlers and reporters that capture screenshots, videos, and logs when tests fail.
Handling Common Automation Challenges
Working with Dynamic Content
Modern web applications often use frameworks like React, Angular, or Vue.js that dynamically update the DOM without full page reloads. This can present challenges for automation.
// Wait for dynamic content to appear
await page.waitForSelector('.dynamic-content', { state: 'visible' });
// Wait for network requests to complete
await page.waitForLoadState('networkidle');
// Wait for a specific condition using polling
await page.waitForFunction(() => {
  return document.querySelectorAll('.item').length > 5;
});
// Handle WebSocket-based updates
await page.waitForFunction(() => {
  return window.chatMessages && window.chatMessages.length > 0;
});
For Single Page Applications (SPAs), it's important to understand the framework's lifecycle and update mechanisms to create reliable tests.
Cross-Browser Compatibility
While Playwright provides a unified API across browsers, there are still differences in browser behavior that may affect your tests.
Strategies for handling cross-browser differences:
- Browser-specific conditions - Use conditional logic based on browser type
- Feature detection - Check for feature support rather than browser type
- Responsive testing - Test across different viewport sizes
- Graceful degradation - Ensure your app works even when features aren't supported
// Browser-specific test configuration
test.describe('Feature with browser differences', () => {
  test('in Chromium', async ({ browser, browserName }) => {
    test.skip(browserName !== 'chromium', 'Chromium-only test');
    // Chromium-specific test code
  });
  test('in WebKit', async ({ browser, browserName }) => {
    test.skip(browserName !== 'webkit', 'WebKit-only test');
    // WebKit-specific test code
  });
});
// Testing responsive design
test('responsive design', async ({ page }) => {
  // Test on mobile viewport
  await page.setViewportSize({ width: 375, height: 667 });
  await page.goto('/responsive-page');
  await expect(page.locator('.mobile-menu')).toBeVisible();
  // Test on tablet viewport
  await page.setViewportSize({ width: 768, height: 1024 });
  await page.goto('/responsive-page');
  await expect(page.locator('.tablet-layout')).toBeVisible();
  // Test on desktop viewport
  await page.setViewportSize({ width: 1440, height: 900 });
  await page.goto('/responsive-page');
  await expect(page.locator('.desktop-navigation')).toBeVisible();
});
Performance Considerations
As your test suite grows, optimizing performance becomes increasingly important. Here are strategies for keeping your tests fast and efficient:

- Parallel execution - Run tests concurrently to reduce total execution time
- Targeted testing - Run only affected tests when code changes
- Reuse authentication state - Avoid repeated login flows
- Optimize selectors - Use efficient selectors that find elements quickly
- Headless mode - Run tests without UI for faster execution
// Configure parallel execution in playwright.config.js
module.exports = defineConfig({
  // Run tests in files in parallel
  fullyParallel: true,
  // Limit the number of workers on CI, use default locally
  workers: process.env.CI ? 2 : undefined,
  // Shared settings for all projects
  use: {
    // Run headless by default
    headless: true,
    // Only record traces on failure
    trace: 'on-first-retry',
  },
});
Debugging and Troubleshooting
Trace Viewer and Inspector Tools
Playwright provides powerful debugging tools that help you identify and fix issues quickly.
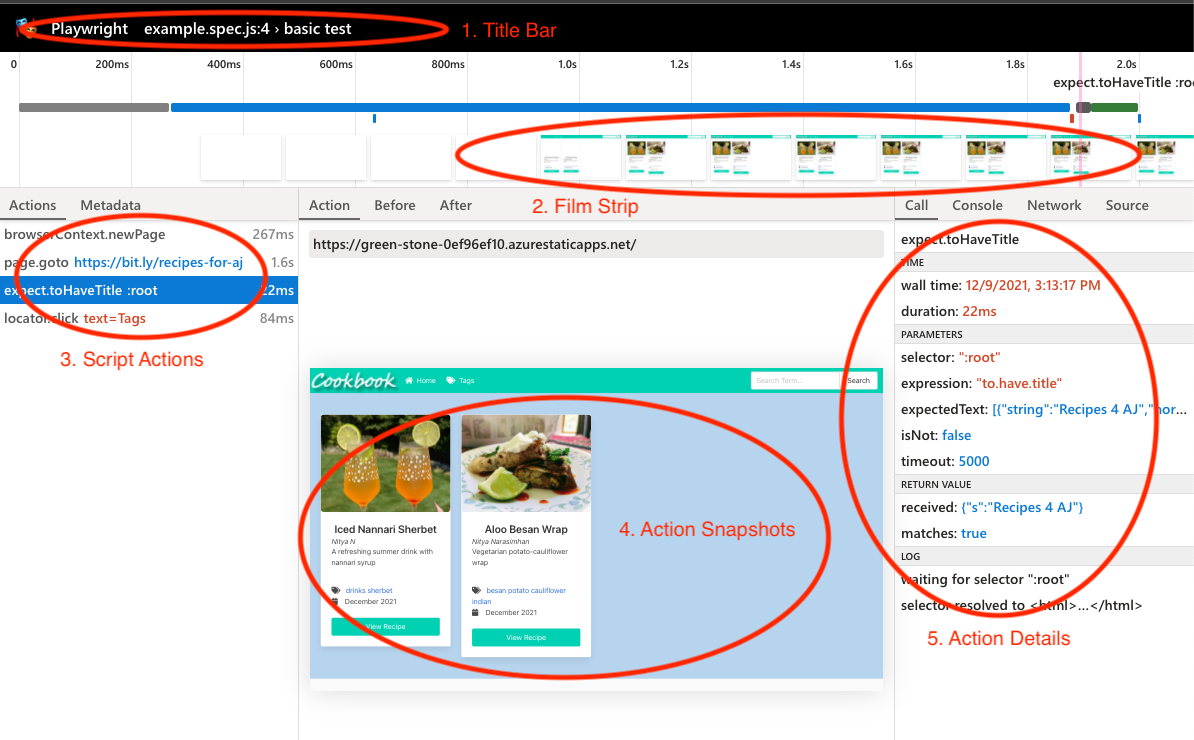
The Trace Viewer is a browser-based tool that lets you explore recorded traces of your test runs. It provides:
- Timeline view of actions and events
- Screenshots at each step
- DOM snapshots for inspecting the page state
- Network requests made during the test
- Console logs and errors
// Enable tracing in your test
test('with tracing', async ({ context, page }) => {
  // Start tracing
  await context.tracing.start({ screenshots: true, snapshots: true });
  await page.goto('https://example.com');
  await page.click('#button');
  // Stop tracing and export to file
  await context.tracing.stop({ path: 'trace.zip' });
});
// View the trace
// npx playwright show-trace trace.zip
For interactive debugging, Playwright offers the Inspector tool, which lets you pause test execution and inspect the page state.
// Run with the inspector
// npx playwright test --debug
// Or add a pause in your test
await page.pause();
Common Issues and Solutions
Here are solutions to some of the most common issues encountered when working with Playwright:
| Issue | Solution |
|---|---|
| Element not found |
|
| Element not clickable |
|
| Timeouts |
|
| Flaky tests |
|
| Authentication issues |
|
Integration with AI-Powered Testing Tools
Leveraging PageOn.ai for Enhanced Testing
While Playwright provides powerful automation capabilities, integrating it with AI-powered tools like PageOn.ai can take your testing to the next level by adding intelligent visualization and management features.

PageOn.ai enhances Playwright testing in several key ways:
AI Blocks for Modular Testing
Create reusable test components that can be combined and rearranged to build complex test scenarios. AI Blocks make test maintenance easier by encapsulating functionality in manageable units.
Deep Search for Test Assets
Quickly find relevant test cases, scripts, and results using natural language queries. Deep Search understands the context of your tests and provides intelligent suggestions.
Vibe Creation for Visual Representation
Transform complex test scenarios into clear visual representations that help stakeholders understand test coverage and results without diving into code.
Agentic Capabilities
Leverage AI agents to automatically generate test cases, identify edge cases, and suggest improvements to your test coverage based on application behavior.
Future Trends in Automated Testing
The integration of AI with testing tools like Playwright is just the beginning. Here are some emerging trends that will shape the future of automated testing:
flowchart LR
    Current[Current State] --> AIGen[AI-Generated Tests]
    Current --> SelfHeal[Self-Healing Scripts]
    Current --> PredAnalysis[Predictive Analysis]
    AIGen --> Future[Future of Testing]
    SelfHeal --> Future
    PredAnalysis --> Future
- AI-assisted test generation - AI systems that can analyze your application and automatically create comprehensive test suites
- Self-healing test scripts - Tests that can automatically adapt to UI changes without manual intervention
- Predictive analysis - AI that identifies areas of your application most likely to contain bugs based on code changes and historical data
- Natural language test creation - The ability to describe tests in plain English and have them automatically translated into executable code
- Visual testing evolution - Beyond pixel comparison to understanding the semantic meaning of UI changes
By combining Playwright's powerful automation capabilities with these emerging AI technologies, QA teams can achieve unprecedented levels of test coverage, reliability, and efficiency.
Best Practices for Playwright Test Automation
Test Organization and Structure
Well-organized tests are easier to maintain, understand, and extend. Here are best practices for structuring your Playwright tests:

- Group related tests using
test.describeblocks - Use tags to categorize tests (e.g.,
@smoke,@regression) - Implement hooks for setup and teardown operations
- Create focused, atomic tests that verify a single piece of functionality
- Follow naming conventions that clearly indicate what each test is verifying
// Well-structured test organization
const { test } = require('@playwright/test');
// Group related tests
test.describe('Authentication flows', () => {
  // Setup common to all tests in this group
  test.beforeEach(async ({ page }) => {
    await page.goto('/login');
  });
  // Individual focused tests
  test('successful login with valid credentials', async ({ page }) => {
    // Test implementation
  });
  test('shows error message with invalid credentials', async ({ page }) => {
    // Test implementation
  });
  // Nested group for related functionality
  test.describe('Password recovery', () => {
    test('sends password reset email', async ({ page }) => {
      // Test implementation
    });
  });
});
// Tagged tests for selective execution
test('critical path checkout flow @smoke', async ({ page }) => {
  // Test implementation
});
Continuous Integration Strategies
Integrating Playwright tests into your CI/CD pipeline ensures that tests run automatically on code changes, providing fast feedback to developers.
flowchart LR
    Code[Code Changes] --> Build[Build]
    Build --> UnitTests[Unit Tests]
    UnitTests --> Playwright[Playwright Tests]
    Playwright --> Report[Test Reports]
    Playwright -- Pass --> Deploy[Deploy]
    Playwright -- Fail --> Notify[Notify Team]
Here's an example GitHub Actions workflow for running Playwright tests:
name: Playwright Tests
on:
push:
branches: [ main, master ]
pull_request:
branches: [ main, master ]
jobs:
test:
runs-on: ubuntu-latest
steps:
- uses: actions/checkout@v3
- name: Setup Node.js
uses: actions/setup-node@v3
with:
node-version: 18
- name: Install dependencies
run: npm ci
- name: Install Playwright browsers
run: npx playwright install --with-deps
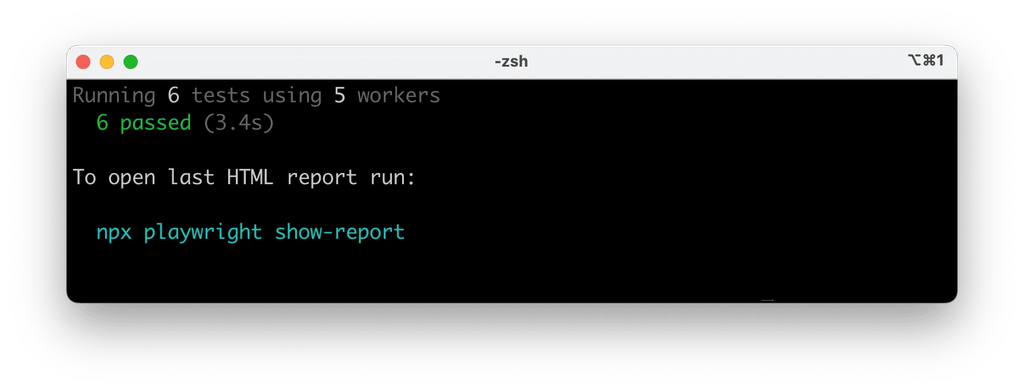
- name: Run Playwright tests
run: npx playwright test
- name: Upload test results
if: always()
uses: actions/upload-artifact@v3
with:
name: playwright-report
path: playwright-report/
retention-days: 30
For optimal CI/CD integration, consider these strategies:
- Run smoke tests on every commit to catch critical issues quickly
- Schedule full regression tests for nightly runs
- Implement test sharding to distribute tests across multiple runners
- Configure retries for flaky tests in CI environments
- Archive test artifacts (reports, screenshots, videos) for debugging failed runs
Code Quality and Maintenance
Maintaining high code quality in your test automation codebase is just as important as in your application code.
Linting and Formatting
Use ESLint and Prettier to enforce coding standards and maintain consistent formatting across your test codebase.
// .eslintrc.js
module.exports = {
  extends: ['plugin:playwright/recommended'],
  rules: {
    'playwright/no-wait-for-timeout': 'error',
    'playwright/no-force-option': 'warn',
  }
};
Code Review Practices
Establish clear guidelines for reviewing test code, focusing on reliability, maintainability, and coverage.
- Check for proper assertions
- Verify error handling
- Look for duplicated code
- Ensure tests are independent
- Validate selector strategies
Documentation
Document your test framework, utilities, and patterns to help new team members understand and contribute effectively.
- README with setup instructions
- JSDoc comments for utilities
- Test strategy documentation
- Naming conventions guide
Refactoring Strategies
Regularly refactor test code to maintain quality and keep up with application changes.
- Extract common patterns into utilities
- Update selectors when UI changes
- Consolidate duplicate test steps
- Remove obsolete tests
Remember that test code is production code. It requires the same level of care, maintenance, and refactoring as your application code to remain valuable and effective over time.
Conclusion and Resources
Key Takeaways for QA Engineers
Playwright represents a significant advancement in browser automation technology, offering QA engineers powerful tools to create reliable, efficient, and maintainable test suites.
- Modern architecture designed for today's web applications
- Cross-browser support with a unified API
- Powerful selectors and auto-waiting mechanisms
- Rich debugging tools for quick issue resolution
- Excellent integration with CI/CD pipelines
- Growing ecosystem and community support
By combining Playwright with AI-powered tools like PageOn.ai, QA teams can transform fuzzy testing concepts into clear, visual test scenarios that are both robust and maintainable.
Recommended Learning Path
To master Playwright for browser control, follow this structured learning path:
- Basics - Set up Playwright and write your first tests
- Selectors - Master different selector strategies
- Page Object Model - Implement POM for maintainable tests
- Advanced Features - Learn network interception, authentication, and visual testing
- Debugging - Become proficient with Trace Viewer and other debugging tools
- CI/CD Integration - Set up automated testing in your pipeline
- AI Integration - Explore how PageOn.ai can enhance your testing workflow
Community Resources and Support
Connect with the Playwright community and access helpful resources:
- Official Documentation - Comprehensive guides and API reference
- GitHub Repository - Source code, issues, and discussions
- Discord Community - Chat with other Playwright users and contributors
- Interactive web parts - Learn about transforming knowledge sharing with interactive components
- AI agent testing frameworks - Comprehensive benchmark and performance comparison guide
For enhancing your testing workflows with AI-powered visualization and management:
- AI for scriptwriting - Learn how AI can help create test scripts
- AI script writing tools - Tools to automate test script creation
- Presentation automation with ChatGPT - Automating test reports and presentations
Transform Your Testing Experience with PageOn.ai
Take your Playwright testing to the next level with PageOn.ai's visualization tools and AI-powered test management. Create clear, visual representations of complex test scenarios and leverage AI to optimize your testing strategy.
Explore PageOn.ai TodayYou Might Also Like
The Strategic GIF Guide: Creating Memorable Moments in Professional Presentations
Discover how to effectively use GIFs in professional presentations to create visual impact, enhance audience engagement, and communicate complex concepts more memorably.
Tracking Presentation Engagement: Transform Your Impact With Built-in Analytics
Discover how built-in analytics transforms presentation engagement. Learn to track audience behavior, implement data-driven strategies, and maximize your presentation impact.
Revolutionizing Presentations: How AI-Generated Visuals Transform Slide Design
Discover how AI-generated visuals are transforming presentation design, saving hours of effort while creating stunning slides that engage audiences and communicate ideas effectively.
Mastering the Three-Body Structure for Compelling Business Presentations | PageOn.ai
Transform ordinary business presentations into compelling visual narratives using the three-body storytelling structure. Learn techniques for creating impactful openings, persuasive middles, and inspiring closings.