Converting SVG to PNG: Methods, Tools, and Best Practices
A comprehensive guide to transforming vector graphics into universally compatible images
Understanding SVG and PNG File Formats
When I work with digital graphics, I often need to understand the fundamental differences between file formats. SVG (Scalable Vector Graphics) and PNG (Portable Network Graphics) represent two distinct approaches to digital imagery, each with its own strengths and ideal use cases.
SVG Characteristics
- Vector-based format using mathematical equations
- Infinitely scalable without quality loss
- XML-based structure (editable with text editors)
- Smaller file sizes for simple graphics
- Interactive elements and animations possible
- Ideal for logos, icons, and illustrations
PNG Characteristics
- Raster-based format using fixed pixels
- Universal compatibility across platforms
- Lossless compression maintains quality
- Full alpha channel transparency support
- Ideal for screenshots and complex images
- No vector scalability (fixed resolution)
SVG vs PNG: Structure Comparison
When to Convert SVG to PNG
I've found several scenarios where converting from SVG to PNG becomes necessary:
- Compatibility requirements - When working with platforms or software that don't support SVG files
- Web optimization - For complex SVGs where the rasterized PNG might actually be smaller
- Presentation software needs - When import SVG into Google Slides isn't working as expected
- Fixed display requirements - When you need to ensure the graphic appears exactly the same across all devices
- Print production - When preparing assets for certain print workflows
Online Conversion Solutions
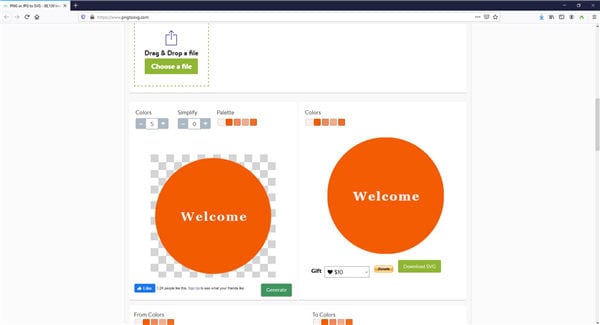
In my experience, online conversion tools offer the quickest path from SVG to PNG without requiring software installation. These web-based services have become increasingly sophisticated, offering features previously only available in desktop applications.
Popular Online Converters
| Converter | Max File Size | Batch Processing | Privacy Policy | Special Features |
|---|---|---|---|---|
| SVGtoPNG.com | Unlimited | Up to 20 files | Files deleted after 1 hour | ZIP download option |
| Convertio | 100MB (free) | Yes | Files deleted after 24 hours | Cloud storage integration |
| CloudConvert | 1GB (free tier) | Yes | GDPR compliant | API access |
| EZGIF | 35MB | Limited | Files deleted after processing | Resolution customization |
Typical Conversion Process
flowchart LR
    A[Upload SVG File] --> B[Select Conversion Options]
    B --> C[Process Conversion]
    C --> D[Preview Result]
    D --> E{Satisfied?}
    E -->|Yes| F[Download PNG]
    E -->|No| G[Adjust Settings]
    G --> B
Key Considerations
Security and Privacy
When I use online converters, I always check their privacy policies. Most reputable services like SVGtoPNG.com delete uploaded files after a short period (typically 1-24 hours), but it's still important to avoid uploading sensitive or confidential designs.
File Size Limitations
Free tiers typically limit individual file sizes and total conversion volume. For large-scale needs, consider desktop solutions.
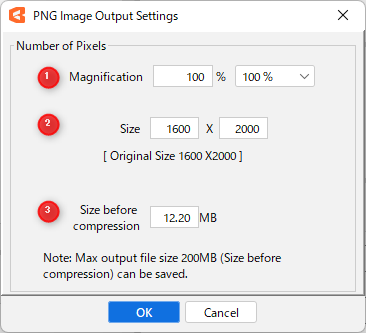
Output Quality Options
Better converters offer resolution and quality settings. Higher DPI settings produce larger but clearer PNG outputs.
Batch Processing
For multiple conversions, look for batch processing features to save time and ensure consistent output settings.
Desktop Software Solutions
When I need more control over the conversion process or work with sensitive files, I turn to desktop software solutions. These tools offer enhanced features, batch processing capabilities, and don't require internet connectivity.
Adobe Photoshop Workflow
flowchart TD
    A[Open SVG in Photoshop] --> B[SVG Import Options Dialog]
    B --> C[Adjust Canvas Size/Resolution]
    C --> D[Make Any Desired Edits]
    D --> E[File > Export > Export As]
    E --> F[Select PNG Format]
    F --> G[Configure PNG Options]
    G --> H[Export File]
When using Photoshop for conversion, I follow these steps to ensure optimal quality:
- Open the SVG file in Photoshop (File > Open)
- In the import dialog, set the desired dimensions and resolution (300 DPI for print, 72-150 DPI for web)
- Once opened, verify the image appears as expected
- Select File > Export > Export As...
- Choose PNG format from the dropdown menu
- Enable transparency if needed
- Adjust quality settings as required
- Click Export to save the PNG file
Free Alternatives by Operating System
Windows
- Inkscape (File > Export PNG Image)
- GIMP (import SVG, export as PNG)
- Paint.NET (with SVG plugin)
- IrfanView (with plugins)
macOS
- Preview (open SVG, Export as PNG)
- Inkscape (macOS version)
- GIMP (macOS version)
- Sketch (native support)
Linux
- Inkscape (native Linux support)
- GIMP (native Linux support)
- Krita (with SVG import)
- ImageMagick (command line)
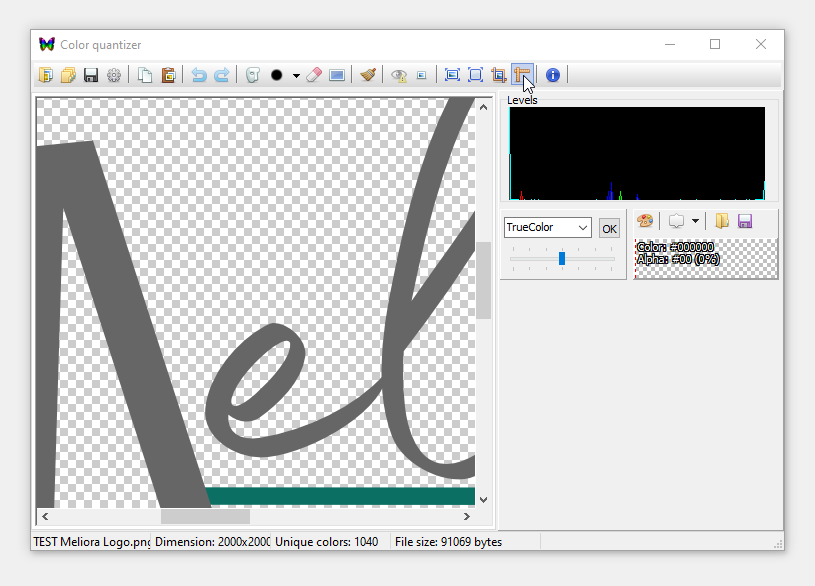
Quality Considerations
When converting SVG to PNG using desktop software, I pay special attention to these quality factors:
- Resolution settings - Higher DPI values create larger but more detailed PNG files. I typically use 72-150 DPI for web graphics and 300+ DPI for print.
- Transparency preservation - Ensure the PNG export settings maintain alpha channel transparency if present in the original SVG.
- Anti-aliasing - Most software applies this by default, but verify it's enabled for smooth edges.
- Color profile - Match the color profile to your intended use (sRGB for web, CMYK for print).
- Canvas dimensions - Set appropriate dimensions before export to avoid unnecessary scaling.

Command-Line and Developer Solutions
As someone who occasionally needs to automate conversion processes, I've found command-line tools and programming libraries invaluable for batch processing and workflow integration.
Browser Developer Tools Method
- Open SVG file directly in Chrome or Firefox
- Right-click on the image and select "Inspect" or press F12
- In Console tab, paste and run:
-
const svg = document.querySelector('svg');
const canvas = document.createElement('canvas');
const ctx = canvas.getContext('2d');
const svgData = new XMLSerializer().serializeToString(svg);
const img = new Image();
img.onload = function() {
canvas.width = img.width;
canvas.height = img.height;
ctx.drawImage(img, 0, 0);
const pngData = canvas.toDataURL('image/png');
const a = document.createElement('a');
a.href = pngData;
a.download = 'image.png';
a.click();
};
img.src = 'data:image/svg+xml;base64,' + btoa(svgData);
Command-Line Utilities
ImageMagick
With resolution control:
Inkscape CLI
With DPI setting:
Programming Libraries
flowchart LR
    A[Input SVG] --> B{Library}
    B -->|JavaScript| C[svg2png]
    B -->|Python| D[CairoSVG]
    B -->|PHP| E[Imagick]
    B -->|Node.js| F[sharp]
    C --> G[Output PNG]
    D --> G
    E --> G
    F --> G
JavaScript/Node.js Example
sharp('input.svg')
.png({ quality: 90 })
.resize(800, 600)
.toFile('output.png')
.then(() => console.log('Conversion complete'))
Python Example
svg2png(url='input.svg', write_to='output.png')
svg2png(
url='input.svg',
write_to='output.png',
output_width=800,
output_height=600
)
CI/CD Pipeline Integration
For development workflows, I often integrate SVG to PNG conversion in continuous integration pipelines:
Example GitHub Actions workflow:
name: Convert SVG to PNG
on:
  push:
    paths:
      - '**.svg'
jobs:
  convert:
    runs-on: ubuntu-latest
    steps:
      - uses: actions/checkout@v2
      - name: Install dependencies
        run: |
          sudo apt-get update
          sudo apt-get install -y librsvg2-bin
      - name: Convert SVGs to PNGs
        run: |
          mkdir -p dist/images
          for file in assets/*.svg; do
            filename=$(basename -- "$file")
            name="${filename%.*}"
            rsvg-convert -f png -o "dist/images/$name.png" "$file"
          done
      - name: Upload artifacts
        uses: actions/upload-artifact@v2
        with:
          name: png-images
          path: dist/images/

Common Challenges and Solutions
Throughout my experience with SVG to PNG conversions, I've encountered several recurring challenges. Here are the most common issues and their solutions:
Preserving Transparency
One of the most common issues I face is losing transparency during conversion.
Solution:
- Ensure your SVG has a transparent background (not a white rectangle)
- When exporting, select PNG-24 or PNG-32 format which supports alpha channels
- In Photoshop, check "Transparency" in the Export As dialog
- In command-line tools, use appropriate flags (e.g.,
--export-background-opacity=0in Inkscape)
Handling Complex SVG Elements
Complex SVG features like gradients, filters, and masks sometimes render incorrectly when converted to PNG.
SVG Feature Conversion Success Rate
Solution:
- Use professional tools like Inkscape or Adobe Illustrator for complex SVGs
- For gradients, ensure they're defined using standard methods
- For filters, consider pre-rendering them in vector software
- Some effects may need manual recreation in raster format
- For critical designs, convert a test section first to identify issues
Resolution and Scaling Issues
When converting vector SVGs to raster PNGs, determining the optimal resolution can be challenging.
Solution:
I recommend following these resolution guidelines based on intended use:
- Web/Screen display: 72-150 DPI (1x-2x for retina/high-DPI)
- Print materials: 300 DPI minimum
- Large format printing: 150-300 DPI (size-dependent)
- Calculate dimensions based on largest intended display size
- When in doubt, convert at multiple resolutions
Text and Font Issues
Text elements in SVGs can cause problems during conversion, especially with custom or uncommon fonts.
Solution:
- Convert text to paths/outlines before exporting (best practice)
- Ensure fonts are embedded in the SVG if keeping as text
- Use common fonts that are widely available across systems
- Check text rendering after conversion, especially small text
- For critical text elements, consider higher resolution output
Troubleshooting Quality Loss
Common Causes
- Insufficient resolution settings
- Anti-aliasing disabled
- Conversion tool limitations
- Complex gradients or effects
- Overly complex paths
Quick Fixes
- Increase output resolution
- Try a different conversion tool
- Simplify complex elements
- Enable anti-aliasing and smooth edges
- Export at 2x intended size, then scale down
Specialized Use Cases
Converting SVG for Presentation Software
When preparing visual assets for presentations, I often need to convert SVG files to PNG format for compatibility with various presentation platforms.
Google Slides Integration
While Google Slides does support SVG imports, I've found that certain complex SVGs don't render correctly. In these cases, converting to PNG is the best solution.
For a streamlined workflow, I recommend:
- First attempt to import SVG into Google Slides directly
- If rendering issues occur, convert the SVG to PNG
- Import the PNG into your presentation
- After completing your presentation, you can save Google Slides as PNG or JPEG for distribution
PowerPoint Compatibility
Modern PowerPoint versions have improved SVG support, but for maximum compatibility, especially when sharing presentations across different Office versions, PNG conversion is often safer.
For existing presentations in other formats:
- You can convert visio to ppt online for technical diagrams
- For document-based presentations, convert PDF to PPT tools can help
- When working with existing images, tools to convert images to editable PPT can be valuable
Workflow Comparison: SVG vs. PNG in Presentation Software
flowchart TD
    A[Create Graphic] --> B{Use in Presentation?}
    B -->|Google Slides| C{Complex SVG?}
    B -->|PowerPoint| D{Office Version?}
    C -->|Yes| E[Convert to PNG]
    C -->|No| F[Direct SVG Import]
    D -->|Modern/365| G[Direct SVG Import]
    D -->|Older/Shared| H[Convert to PNG]
    E --> I[Import PNG to Slides]
    F --> J[Adjust as needed]
    G --> K[Test compatibility]
    H --> L[Import PNG to PPT]
E-commerce and Web Optimization
For e-commerce websites, product images and graphics need to load quickly while maintaining visual quality. When working with SVG product diagrams or icons, I consider these factors:
When to Keep SVG
- Simple icons and UI elements
- Graphics that need animation
- Elements requiring different colors on hover
- When file size is smaller than equivalent PNG
- For responsive designs that scale across devices
When to Convert to PNG
- Complex product photographs or renderings
- When browser support for SVG is uncertain
- For complex graphics where PNG is actually smaller
- When integrating with systems that don't support SVG
- For social media sharing thumbnails
Mobile App Asset Preparation
When developing mobile applications, asset preparation requires careful consideration of format and resolution:
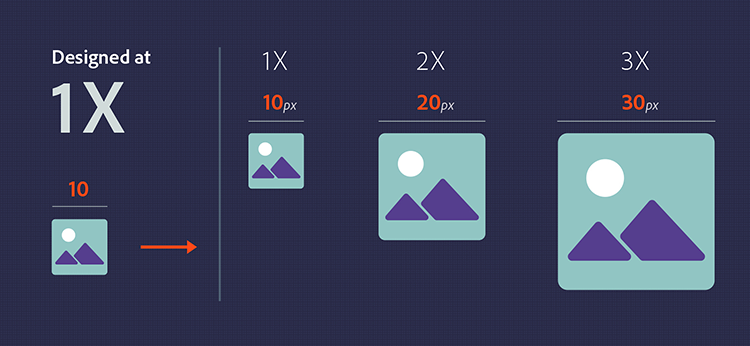
Mobile Asset Resolution Requirements
When preparing SVG assets for mobile apps, I follow these conversion guidelines:
- iOS development: Convert SVGs to PNG at 1x, 2x, and 3x resolutions
- Android development: Convert to multiple densities (mdpi, hdpi, xhdpi, xxhdpi, xxxhdpi)
- Use automated tools to generate all required resolutions from a single SVG
- Consider using PDF vector format for iOS and VectorDrawable for Android as alternatives
- Test rendering on actual devices to ensure quality
Print-Ready Graphics Requirements
For print materials, high-quality conversion is critical:
Print Conversion Best Practices
- Always convert at 300 DPI minimum (600 DPI for fine details)
- Use CMYK color profile for commercial printing
- Include bleed area if the graphic extends to page edges
- Consider converting text to outlines/paths before PNG conversion
- For large format printing, calculate optimal resolution based on viewing distance
Best Practices for Optimal Results
After years of working with SVG to PNG conversions, I've developed a set of best practices that consistently produce optimal results. Here are my recommendations:
Recommended Resolution Settings
| Purpose | Recommended DPI | File Format | Additional Notes |
|---|---|---|---|
| Website/Digital Display | 72-96 DPI | PNG-24 | Consider 2x for high-DPI screens |
| Mobile Apps | Multiple densities | PNG-32 | Create all required density variants |
| Standard Print | 300 DPI | PNG-24 | CMYK color profile |
| Fine Art/Photo Prints | 300-600 DPI | PNG-24 | Consider TIFF for printing workflow |
| Large Format (Banners) | 150-300 DPI | PNG-24 | Scale based on viewing distance |
| Presentations | 150-200 DPI | PNG-24 | Balance quality vs. file size |
Preparing SVG Files Before Conversion
- Clean up unnecessary elements - Remove hidden layers, unused definitions, and comments
- Optimize paths - Simplify complex paths when possible
- Convert text to outlines - Especially for non-standard fonts
- Set explicit dimensions - Ensure width and height attributes are defined
- Check viewBox attribute - Properly define the coordinate system
- Validate SVG structure - Use tools like svgcleaner to fix issues
- Embed resources - Include external references like images
- Simplify filters and effects - Some complex effects may not convert well
- Check transparency - Ensure background is transparent if needed
- Remove script elements - Interactive elements won't work in PNG
SVG Preparation Workflow
flowchart LR
    A[Original SVG] --> B[Clean & Optimize]
    B --> C[Convert Text to Paths]
    C --> D[Set Dimensions]
    D --> E[Check Transparency]
    E --> F[Validate Structure]
    F --> G[Ready for Conversion]
Quality Assurance Checks
After conversion, I always perform these quality checks:
- Visual inspection - Compare the PNG with the original SVG at 100% zoom
- Edge quality check - Look for jagged edges or artifacts, especially on curved elements
- Text legibility - Ensure all text is clear and readable
- Transparency verification - View against different backgrounds to confirm transparency
- Color accuracy - Compare colors to ensure they match the original
- File size assessment - Check if the PNG file size is appropriate for its intended use
- Resolution confirmation - Verify the PNG dimensions match expectations
Workflow Optimization
For teams that regularly convert SVG files to PNG, I recommend establishing an efficient workflow:
Time Savings with Optimized Workflows
For Occasional Use
- Bookmark reliable online converters
- Create a simple checklist for settings
- Store commonly used settings
- Use consistent file naming
For Regular Use
- Install dedicated conversion software
- Create batch processing scripts
- Develop standard presets for different uses
- Implement file organization system
For Professional Teams
- Automate with CI/CD pipelines
- Integrate with design systems
- Implement version control for assets
- Use PageOn.ai for visual asset management
Using PageOn.ai for Visual Asset Management
For teams working with multiple file formats, I've found that PageOn.ai offers significant advantages for managing the conversion and organization of visual assets:
- Centralized asset management - Store both SVG originals and PNG conversions in one organized system
- Automated conversion workflows - Set up rules to automatically generate PNG versions when SVGs are updated
- Consistent output settings - Apply standardized conversion parameters across your team
- Version control - Track changes and maintain history of both vector and raster assets
- Seamless integration - Connect with presentation software and other tools in your workflow
- Collaborative features - Allow team members to access and convert files as needed

Transform Your Visual Expressions with PageOn.ai
Stop struggling with file conversions and complex workflows. PageOn.ai provides a seamless platform for managing all your visual assets, from SVG to PNG and beyond, with intelligent automation and team collaboration features.
Start Creating with PageOn.ai TodayConclusion: Choosing the Right SVG to PNG Conversion Approach
Throughout this guide, I've shared my experience with various SVG to PNG conversion methods. The best approach depends on your specific needs, technical comfort level, and workflow requirements.
For occasional conversions, online tools like SVGtoPNG.com offer convenience and simplicity. For regular use, desktop applications like Inkscape or Adobe Photoshop provide greater control and quality. For development teams, command-line utilities and programming libraries enable automation and integration.
Regardless of the method you choose, following best practices for preparation, resolution settings, and quality assurance will ensure optimal results. Remember that the goal is to maintain as much of the original SVG's visual fidelity as possible while gaining the universal compatibility of the PNG format.
For teams working with multiple visual formats across different platforms, I've found that PageOn.ai offers an integrated solution that streamlines the entire process from creation to conversion to deployment. By centralizing your visual asset management, you can ensure consistency, save time, and focus more on creating impactful visual expressions rather than managing file conversions.
You Might Also Like
Creating Interactive and Animated Infographics for Enhanced User Engagement
Discover how to transform data into captivating interactive stories through animated infographics. Learn best practices, technical approaches, and tools for creating engaging visual experiences.
Transforming Industries with Language Models: From Summarization to Question Answering
Explore practical applications of language models from text summarization to question answering systems. Learn how LLMs are transforming healthcare, finance, e-commerce and more with PageOn.ai.
Mastering Investor Communication: Angel to Series C Fundraising Visuals
Learn how to adapt your fundraising visual strategy from Angel to Series C. Discover stage-specific investor communication techniques and create compelling fundraising materials.
Mastering Live Product Demonstrations in Investor Meetings | Captivating Presentation Guide
Learn how to create powerful live product demonstrations that captivate investors, showcase your product's value, and help secure funding through strategic visual storytelling techniques.