Deploy NextJS Apps to Vercel in Under 10 Minutes
A comprehensive guide to seamless deployment for Next.js applications
Introduction to Vercel Deployment for Next.js
I've been deploying Next.js applications for years, and I can confidently say that Vercel offers the smoothest deployment experience for Next.js projects. This makes perfect sense considering Vercel is the company behind Next.js itself.
Why Vercel for Next.js?
- Zero-configuration deployment - Vercel automatically detects your Next.js application and applies the optimal build settings.
- Built by the creators of Next.js - This ensures first-class support for all Next.js features and optimal performance.
- Automatic performance optimizations - Includes edge caching, image optimization, and global CDN distribution.
- Seamless GitHub integration - Deploy directly from your repository with automatic preview deployments for pull requests.
What You'll Need
- A Next.js application ready for deployment
- A GitHub, GitLab, or Bitbucket account
- A Vercel account (the free tier works perfectly for most projects)
By the end of this guide, you'll be able to deploy your Next.js application to Vercel in under 10 minutes, complete with custom domains, environment variables, and continuous deployment.
Preparing Your Next.js Project for Deployment
Before deploying to Vercel, I always make sure my Next.js project is properly prepared. This ensures a smooth deployment process and helps avoid common pitfalls.
Setting Up Your Project Repository
First, ensure your project is properly set up with Git and has a proper .gitignore file to exclude unnecessary files:
.next/
out/
/node_modules
/.pnp
.pnp.js
.env*.local
.DS_Store
*.pem
npm-debug.log*
yarn-debug.log*
yarn-error.log*
Next, ensure your environment variables are properly configured. Create a .env.local file for local development:
DATABASE_URL="your_database_connection_string"
NEXT_PUBLIC_API_URL="your_api_url"
AUTH_SECRET="your_auth_secret"
Running Pre-Deployment Checks
I always run these checks before deploying to Vercel:
-
Audit dependencies for vulnerabilities:
npm audit -
Test your application build locally:
npm run build -
Fix any ESLint warnings or errors:
npm run lint
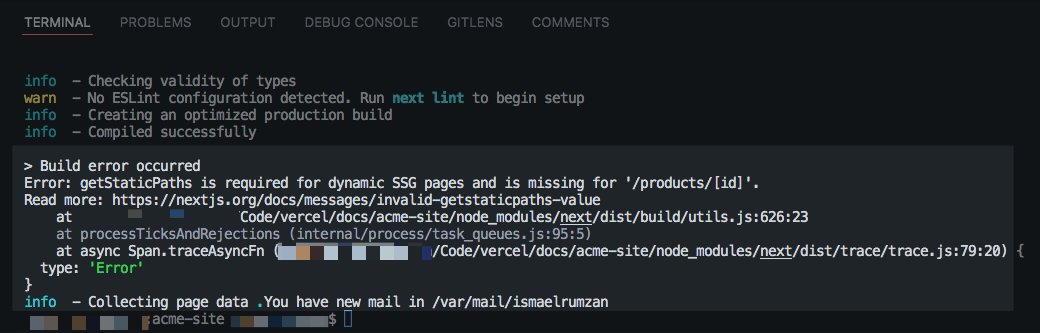
Tip: If you encounter build errors locally, they will also occur during deployment. Always fix these issues before pushing to Vercel.
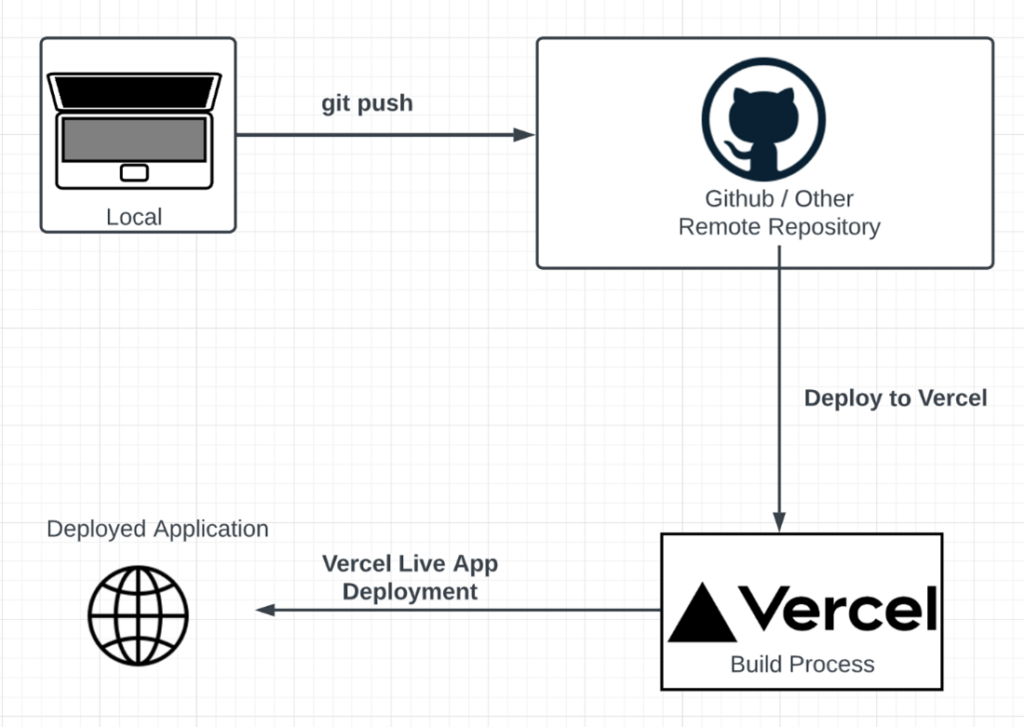
Connecting Your Repository to Vercel
Now that your project is ready, it's time to connect it to Vercel. This process is incredibly straightforward and takes just a few minutes.
Creating and Setting Up Your Vercel Account
- Go to vercel.com and sign up for an account if you don't already have one.
- I recommend signing up with your GitHub account for seamless integration.
- Once logged in, you'll be taken to your dashboard.
Importing Your Next.js Repository
- Click the "Add New..." button and select "Project" from the dropdown.
- Select the Git provider where your repository is hosted (GitHub, GitLab, or Bitbucket).
- Authorize Vercel to access your repositories if prompted.
- You'll see a list of your repositories. Find and select your Next.js project.
- If you don't see your repository, you may need to configure the Vercel GitHub app to include it.
flowchart LR
    A[Local Project] -->|Push to| B[GitHub Repository]
    B -->|Import to| C[Vercel Project]
    C -->|Deploy to| D[Production]
    B -->|Pull Request| E[Preview Deployment]
    E -.->|Merge| D
Once you've selected your repository, Vercel will automatically detect that it's a Next.js project and pre-configure most settings for you.
Configuring Your Deployment Settings
After selecting your repository, you'll need to configure a few settings before deploying your Next.js application.
Build Configuration
Vercel automatically detects Next.js projects and sets the correct build configuration. However, you can customize these settings if needed:
- Build Command: By default, this is set to
next build. You might need to modify this if you have a custom build process. - Output Directory: For Next.js, this is typically
.nextand should be detected automatically. - Install Command: By default, this is
npm installoryarn installdepending on your lockfile.
Environment Variables
One of the most critical steps is setting up your environment variables. These should match what you have in your .env.local file:
- Scroll down to the "Environment Variables" section.
- Add each variable from your
.env.localfile. - For sensitive information like API keys, ensure they're properly secured.
- Remember that variables prefixed with
NEXT_PUBLIC_will be exposed to the browser.
Important: Never commit sensitive environment variables to your repository. Always use Vercel's environment variable UI for production secrets.
Deployment Options
You can customize several deployment options:
- Production Branch: By default, this is set to
mainormaster. - Framework Preset: Should be automatically set to Next.js.
- Root Directory: If your Next.js project is in a subdirectory, specify it here.
Once you've configured these settings, click "Deploy" to start the deployment process.
Advanced Deployment Features
After your initial deployment, you can take advantage of Vercel's advanced features to optimize your workflow and application performance.
Continuous Deployment Workflows
Vercel automatically sets up continuous deployment for your project. Here's how it works:
flowchart TD
    A[Push to Main Branch] -->|Triggers| B[Production Deployment]
    C[Create Pull Request] -->|Triggers| D[Preview Deployment]
    D -->|Accessible via Unique URL| E[Review Changes]
    E -->|Approve PR| F[Merge to Main]
    F -->|Triggers| B
You can also set up additional deployment triggers:
- Deployment Hooks: Create webhook URLs that trigger deployments when called.
- Vercel CLI: Deploy manually using the Vercel command-line interface.
- GitHub Actions: Set up custom workflows that trigger deployments.
Optimizing Your Deployment Pipeline
Leverage these features to optimize your Next.js application on Vercel:
- Incremental Static Regeneration (ISR): Use
revalidatein yourgetStaticPropsto update static pages without full rebuilds. - Edge Functions: Deploy lightweight functions globally for improved performance.
- Image Optimization: Leverage Next.js Image component for automatic image optimization.
- Caching Strategies: Configure caching headers for optimal performance.
Pro Tip: Use Vercel's deployment protection rules to prevent accidental deployments to production. This is especially useful for team environments.
Post-Deployment Optimization and Monitoring
After deploying your Next.js application, it's crucial to monitor its performance and make optimizations as needed.
Monitoring Application Performance
Vercel provides built-in analytics and monitoring tools:

- Analytics: Track page views, performance metrics, and user behavior.
- Core Web Vitals: Monitor key performance metrics like LCP, FID, and CLS.
- Error Tracking: Identify and fix runtime errors in your application.
- Function Invocations: Monitor serverless function usage and performance.
Scaling Your Next.js Application
As your application grows, consider these scaling strategies:
- Static Generation: Pre-render pages at build time when possible for optimal performance.
- Edge Functions: Deploy compute closer to your users for reduced latency.
- Content Delivery: Use Vercel's global CDN for fast content delivery worldwide.
- Optimized Images: Use Next.js Image component to automatically optimize images.
I've found that combining these strategies leads to significant performance improvements, especially for applications with global audiences.
Troubleshooting Common Deployment Issues
Even with Vercel's streamlined deployment process, you might encounter some issues. Here's how to troubleshoot common problems:
Resolving Build Failures
When your build fails, check these common causes:
- Missing Dependencies: Ensure all dependencies are properly listed in your
package.json. - Environment Variables: Check that all required environment variables are configured in Vercel.
- Node.js Version: Verify compatibility between your Node.js version and dependencies.
- Build Command: Ensure your build command is correct for your project setup.
"engines": {
  "node": ">=18.0.0"
},
"scripts": {
  "dev": "next dev",
  "build": "next build",
  "start": "next start",
  "lint": "next lint"
}
Addressing Runtime Errors
If your application builds successfully but encounters runtime errors:
- Check Server Logs: Review function logs in the Vercel dashboard.
- API Routes: Verify that API routes are functioning correctly.
- Client-Side Errors: Use browser developer tools to identify client-side issues.
- Environment Differences: Look for discrepancies between development and production environments.
Common Mistake: Forgetting to add environment variables to Vercel that were present in local development.
Best Practices for Production Deployments
After deploying hundreds of Next.js applications to Vercel, I've developed these best practices for production deployments:
Environment Variable Management
flowchart TD
    A[Environment Variables] --> B{Variable Type?}
    B -->|Public| C[Prefix with NEXT_PUBLIC_]
    B -->|Private| D[Keep Secret]
    C --> E[Available in Browser]
    D --> F[Only Available on Server]
    E --> G[Store in Vercel]
    F --> G
    G --> H[Different Values per Environment]
- Use Environment Specific Values: Configure different values for development, preview, and production environments.
- Secure Sensitive Data: Never expose API keys or secrets in client-side code.
- Rotation Strategy: Implement a regular rotation schedule for sensitive credentials.
Custom Domain and SSL Configuration

Setting up custom domains on Vercel is straightforward:
- Go to your project settings and navigate to the "Domains" tab.
- Add your domain and follow the verification instructions.
- Vercel will automatically provision an SSL certificate via Let's Encrypt.
- Configure redirects if needed (e.g., www to non-www or vice versa).
Leveraging Vercel Integrations
Enhance your deployment workflow with these integrations:
- Analytics Platforms: Connect Google Analytics, Plausible, or Fathom for visitor tracking.
- Error Monitoring: Integrate SOAR cybersecurity platforms or Sentry for comprehensive error tracking.
- CMS Webhooks: Set up automatic deployments when content changes in your CMS.
- Performance Monitoring: Use Lighthouse integration for automated performance audits.
Pro Tip: Use AI-powered app integration strategies to connect your Next.js application with other tools in your stack for a more cohesive workflow.
Taking Your Deployment to the Next Level
Once you've mastered the basics of deploying to Vercel, consider these advanced strategies to further optimize your workflow and application performance.
Advanced Deployment Strategies
- A/B Testing: Use Vercel Edge Config to implement A/B testing for your application.
- Feature Flags: Implement feature flags to gradually roll out new features to users.
- Canary Deployments: Deploy changes to a small percentage of users before full rollout.
- Blue-Green Deployments: Maintain two identical production environments for zero-downtime deployments.
Planning for Future Scalability
As your application grows, consider these scalability strategies:
- Modular Architecture: Structure your application with scalability in mind.
- Performance Monitoring: Implement comprehensive monitoring to identify bottlenecks early.
- Caching Strategies: Use ISR and edge caching to handle traffic spikes.
- Database Scaling: Ensure your database can scale with your application's growth.
By implementing these advanced strategies, you'll be well-prepared for your application's growth and success.
Remember that Vercel's platform is designed to scale automatically with your needs, making it an ideal choice for growing Next.js applications.
Transform Your Visual Expressions with PageOn.ai
Ready to take your Next.js visualizations to the next level? PageOn.ai helps you create stunning visual content that communicates complex ideas clearly and effectively.
Whether you're creating diagrams, charts, or interactive visualizations for your Next.js applications, PageOn.ai provides the tools you need to make your content stand out.
Start Creating with PageOn.ai TodayConclusion
Deploying Next.js applications to Vercel is remarkably straightforward, taking just minutes from start to finish. The platform's tight integration with Next.js ensures optimal performance and support for all framework features.
By following this guide, you've learned how to:
- Prepare your Next.js project for deployment
- Connect your repository to Vercel
- Configure deployment settings
- Leverage advanced features for optimization
- Monitor and troubleshoot your application
- Implement best practices for production
With these skills, you're well-equipped to deploy and maintain high-performance Next.js applications on Vercel.
For more advanced visualization needs in your Next.js applications, consider exploring tools like PageOn.ai, which offers powerful capabilities for creating interactive diagrams, charts, and visual content. If you're currently using other tools like Gamma app, check out our comparison to see how PageOn.ai can enhance your workflow.
Having trouble with your visualization tools? Check out our guide to common issues with Gamma.app and how to resolve them.
You Might Also Like
Step-by-Step MCP Server Configuration for Free PowerPoint Presentations | PageOn.ai
Learn how to set up and configure an MCP server for creating free PowerPoint presentations using AI assistants like ChatGPT and Claude with this comprehensive guide.
Navigating the MCP Ecosystem: Transform Your AI Development Strategy
Explore how the rapidly growing MCP ecosystem is revolutionizing AI development, with market projections reaching $10.3B by 2025 and how to implement your MCP strategy.
Maximizing Google Drive Integration for AI-Powered Presentations | PageOn.ai
Discover how to transform your workflow by integrating Google Drive with AI presentation tools like PageOn.ai. Learn advanced techniques for automated, data-rich visual storytelling.
Engaging Your Audience: Crafting Interactive and Visually Captivating Slides
Discover how to transform static presentations into interactive visual experiences that captivate audiences through strategic design, interactive elements, and data visualization techniques.