PNG to SVG Conversion: Ultimate Guide for Perfect Vector Graphics
Master the art of transforming raster images to scalable vector graphics
Converting PNG files to SVG format unlocks a world of possibilities for designers, developers, and content creators. In this comprehensive guide, I'll walk you through everything you need to know about transforming pixel-based images into infinitely scalable vector graphics, from understanding the fundamental differences between formats to advanced editing techniques.
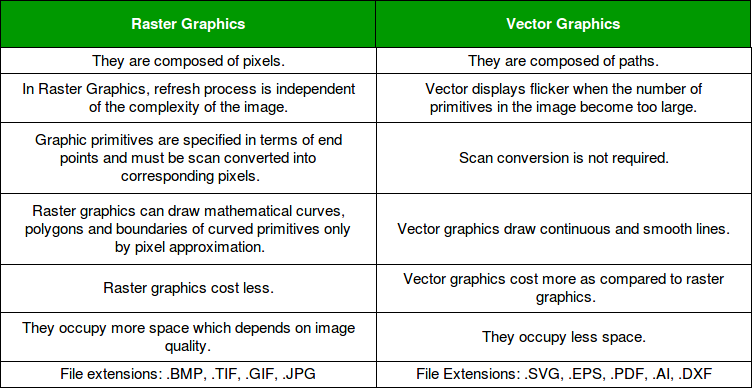
Understanding PNG vs SVG Formats
When I first started working with digital graphics, understanding the fundamental differences between raster and vector formats was a game-changer. Let me explain why these differences matter so much.
Raster (PNG) Graphics
- Made up of individual pixels in a grid
- Resolution-dependent (fixed dimensions)
- Lose quality when scaled up
- Ideal for photographs and complex images
- Larger file sizes for high-quality images
Vector (SVG) Graphics
- Based on mathematical formulas and paths
- Resolution-independent (infinitely scalable)
- Maintain perfect quality at any size
- Ideal for logos, icons, and illustrations
- Typically smaller file sizes
PNG vs SVG: Scaling Comparison
The difference becomes clear when you scale images to different sizes:
Key Use Cases for SVG Format
In my experience, SVGs excel in these scenarios:
- Responsive web design elements that need to look crisp at any size
- Logos and brand assets that will be used across different media
- Interactive web graphics that need to be animated or manipulated
- Icons and UI elements that require perfect rendering at all scales
- Graphics that need to be easily edited or customized later
To help visualize the structural differences between these formats, I've created this comparison using PageOn.ai's AI Blocks feature. This tool makes it easy to understand how raster images store data as pixels while vector graphics use mathematical paths.
flowchart LR
    subgraph PNG["PNG (Raster Format)"]
        P1[Pixel Grid]
        P2[Fixed Resolution]
        P3[Color Data Per Pixel]
    end
    subgraph SVG["SVG (Vector Format)"]
        S1[Mathematical Paths]
        S2[XML-Based Code]
        S3[Scalable Geometry]
    end
    PNG -.-> |"Conversion Process"| SVG
    style PNG fill:#FFE0B2,stroke:#FF8000,stroke-width:2px
    style SVG fill:#BBDEFB,stroke:#1976D2,stroke-width:2px
Converting from PNG to SVG essentially means transforming pixel data into mathematical equations that define shapes, lines, and curves. This process, known as vectorization or tracing, is what we'll explore throughout this guide.
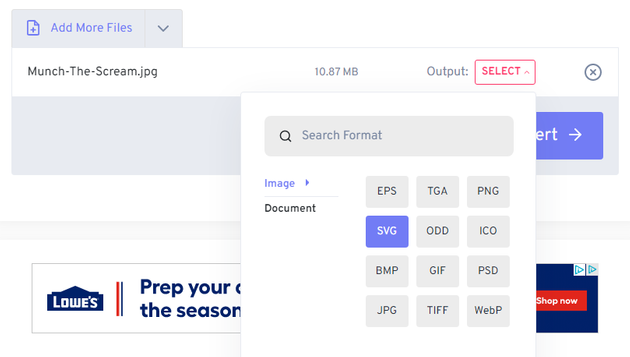
Online PNG to SVG Conversion Tools
When I need to quickly convert PNG files to SVG format without installing software, I turn to these reliable online conversion tools. Each platform offers unique features that might make it more suitable for your specific needs.
Top Online Conversion Platforms
| Platform | Free Tier | Batch Processing | Advanced Settings | Max File Size | Best For |
|---|---|---|---|---|---|
| FreeConvert | Yes | Yes | Extensive | 1GB | All-purpose conversion with fine control |
| EZGIF | Yes | No | Moderate | 35MB | Simple conversions with multiple algorithms |
| Convertio | Limited | Yes | Basic | 100MB | Quick conversions with cloud storage integration |
Quality Comparison
Based on my testing with various image types:
Step-by-Step Conversion Process
Here's how I typically convert a PNG to SVG using FreeConvert:
Step 1: Upload Your PNG File
Click the "Choose Files" button or drag and drop your PNG image onto the upload area. You can select multiple files for batch conversion.
Step 2: Adjust Conversion Settings (Optional)
Click "Advanced Settings" to access options like color count, smoothness, and threshold adjustments. For simple logos, fewer colors often produce cleaner results.
Step 3: Convert and Download
Click the "Convert" button and wait for the process to complete. Then download your new SVG file by clicking the "Download" button.
Choosing the Right Tool for Your Needs
Based on my experience with these platforms, here are my recommendations:
- For simple logos and icons: Any of these tools will work well, but EZGIF often produces the cleanest paths.
- For complex illustrations: FreeConvert offers the most control over the conversion process.
- For batch processing: FreeConvert or Convertio are your best options.
- For beginners: EZGIF has the simplest interface with fewer options to worry about.
Using PageOn.ai's Deep Search feature, I was able to find examples of successful conversions for different image types, which helped me determine which tool would work best for each specific scenario.
Advanced Conversion Settings for Optimal Results
Getting the best possible SVG from your PNG requires understanding and tweaking several key settings. I've spent countless hours experimenting with these parameters to achieve optimal results.
PNG to SVG Conversion Process
flowchart TD
    A[PNG Image Input] --> B[Image Analysis]
    B --> C[Color Quantization]
    C --> D[Path Tracing]
    D --> E[Path Optimization]
    E --> F[SVG Output]
    subgraph "Key Settings"
        C1[Color Count]
        C2[Threshold]
        C3[Smoothness]
        C4[Transparency Handling]
    end
    C1 -.-> C
    C2 -.-> D
    C3 -.-> E
    C4 -.-> B
    style A fill:#FFE0B2,stroke:#FF8000,stroke-width:2px
    style F fill:#BBDEFB,stroke:#1976D2,stroke-width:2px
Understanding Key Conversion Parameters
Color Count
This setting determines how many distinct colors will be used in your SVG. Lower values create simpler files with fewer paths but may lose detail. Higher values preserve more detail but increase file size and complexity.
Recommendation: For logos and simple graphics, start with 8-16 colors. For complex illustrations, try 32-64 colors.
Threshold Settings
Threshold controls how the converter distinguishes between colors and determines path boundaries. Lower thresholds capture more subtle color transitions but may create excessive paths.
Recommendation: Start with a medium threshold (around 50%) and adjust based on preview results.
Smoothness Adjustments
This parameter affects how closely the vector paths follow the original pixel edges. Higher smoothness creates cleaner curves but may lose fine details. Lower smoothness preserves details but can result in jagged paths.
Recommendation: For geometric shapes and logos, use higher smoothness. For detailed illustrations, use lower smoothness.
Transparency Handling
How transparency in your PNG is converted to SVG can significantly impact the final result. Some converters ignore transparency, while others create complex path structures to represent it.
Recommendation: If your PNG has transparency, choose a converter that specifically supports transparency preservation (like FreeConvert).
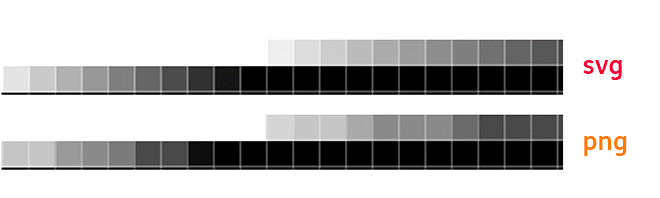
Impact of Color Count on File Size and Quality
Finding Ideal Settings for Different Image Types
| Image Type | Recommended Color Count | Smoothness | Threshold | Special Considerations |
|---|---|---|---|---|
| Simple Logo (2-3 colors) | 2-8 | High (70-90%) | Medium (50%) | Focus on clean edges |
| Complex Logo (gradient/shading) | 16-32 | Medium (40-60%) | Low (30%) | Balance detail vs. file size |
| Line Art/Illustrations | 8-16 | High (70-80%) | Medium-High (60%) | Prioritize path accuracy |
| Icon Sets | 4-12 | High (80%) | Medium (50%) | Optimize for small size display |
| Photographs | 64-128 | Low (20-30%) | Low (20%) | Consider alternative formats |
PageOn.ai's Deep Search has been invaluable in helping me find ideal conversion examples for specific image types. By analyzing successful conversions, I've been able to refine my approach and consistently achieve better results with different kinds of graphics.
DIY Conversion Using Professional Software
For more control over the conversion process, I often turn to professional design software. These tools offer superior tracing algorithms and fine-grained control that online converters simply can't match.
Adobe Illustrator: The Industry Standard
Adobe Illustrator's Image Trace feature is widely considered the gold standard for PNG to SVG conversion. Here's my workflow:
Step 1: Place Your PNG
File > Place to import your PNG into Illustrator. Select the image with the Selection Tool.
Step 2: Access Image Trace
With the image selected, click on the "Image Trace" button in the top control panel or go to Window > Image Trace to open the panel.
Step 3: Choose a Preset or Custom Settings
Select a preset like "Low Fidelity" for simple logos or "High Fidelity Photo" for complex images. For custom results, expand the panel and adjust settings like Mode, Threshold, and Paths.
Step 4: Expand and Clean Up
Once satisfied with the trace, click "Expand" to convert the trace into editable vector paths. Use the Direct Selection Tool (white arrow) to clean up unnecessary points or paths.
Step 5: Export as SVG
File > Export > Export As... and select SVG format. In the SVG options dialog, you can further optimize for web use.

Inkscape: Powerful Free Alternative
Inkscape is an excellent free and open-source alternative that offers powerful tracing capabilities:
Step 1: Import Your PNG
File > Import to bring your PNG into Inkscape. Select the image.
Step 2: Access Trace Bitmap
Path > Trace Bitmap or press Shift+Alt+B to open the tracing dialog.
Step 3: Choose Tracing Method
Select between "Single scan" for simple images or "Multiple scans" for color images. Adjust parameters like Brightness cutoff, Scans, and Colors.
Step 4: Update Preview and Apply
Click "Update" to preview the trace results. When satisfied, click "OK" to create the vector paths.
Step 5: Clean Up and Save as SVG
Use Inkscape's node editing tools to refine the paths if needed. Save your work as an SVG file via File > Save As.
Software Comparison: Automated vs. Manual Tracing
Best Practices for Cleaning Up Auto-Traced SVGs
After auto-tracing, I always follow these steps to optimize my SVGs:
- Simplify Paths: Use the Simplify Path tool (in both Illustrator and Inkscape) to reduce unnecessary anchor points while maintaining shape integrity.
- Remove Artifacts: Delete tiny shapes and dots that may have been created during the tracing process.
- Join Broken Paths: Look for paths that should be connected but were traced as separate objects.
- Optimize Curves: Manually adjust Bézier handles for smoother curves where the auto-trace created awkward angles.
- Consolidate Colors: Merge paths with identical colors to reduce complexity.
- Check Small Text: Text elements often need manual refinement or complete recreation for legibility.

While professional software offers superior results, it does require more time and skill. For complex projects where quality is paramount, I've found that this investment is well worth it. PageOn.ai's visualization tools have helped me document and share these workflows with my team, ensuring consistent results across all our conversion projects.
Troubleshooting Common PNG to SVG Conversion Issues
Even with the best tools and settings, PNG to SVG conversion isn't always perfect. Here are solutions to the most common issues I've encountered:
Jagged Edges and Unwanted Artifacts
Problem: The SVG has rough, jagged edges or tiny specks that weren't in the original.
Solution: Increase the smoothness setting during conversion. For already converted files, use the Simplify Path feature in vector editors. For artifacts, manually delete small unwanted paths.
Prevention: Start with a high-resolution PNG and ensure it has clean, well-defined edges before conversion.
Complex Images with Gradients
Problem: Gradients appear as bands of solid colors or are lost entirely.
Solution: Increase the color count during conversion to capture more gradient steps. In professional software, manually recreate gradients using the gradient tools after tracing the basic shapes.
Alternative: Consider if a hybrid approach might work better—using SVG for the main elements and PNG for complex gradient areas.
Photographs and Highly Detailed Images
Problem: Photographs convert poorly to SVG, with loss of detail or enormous file sizes.
Solution: For photographs, consider a stylized approach using posterization before conversion. This reduces the image to fewer colors and makes it more suitable for vectorization.
Alternative: Sometimes photographs should remain as raster images. SVG is best suited for graphics, not photos.
Optimizing File Size
Problem: The converted SVG file is unnecessarily large.
Solution: Use SVG optimization tools like SVGO or the "Save for Web" option in Illustrator. These tools remove redundant information and compress the SVG code.
Tip: Reduce color count, simplify paths, and remove any hidden elements or unused definitions in the SVG code.
Troubleshooting Decision Tree
flowchart TD
    A[PNG to SVG Issue] --> B{Issue Type?}
    B -->|Jagged Edges| C[Increase Smoothness]
    B -->|Missing Details| D[Decrease Threshold]
    B -->|Too Many Colors| E[Reduce Color Count]
    B -->|File Too Large| F[Optimize SVG]
    C --> G{Improved?}
    D --> G
    E --> G
    F --> G
    G -->|Yes| H[Problem Solved]
    G -->|No| I{Try Different Tool?}
    I -->|Yes| J[Switch Tools]
    I -->|No| K[Manual Vector Redraw]
    J --> A
    K --> H
    style A fill:#FFE0B2,stroke:#FF8000,stroke-width:2px
    style H fill:#C8E6C9,stroke:#4CAF50,stroke-width:2px

Using PageOn.ai to Transform Problematic Images
When faced with particularly challenging images, I've found PageOn.ai's Vibe Creation tool to be incredibly helpful. This feature can transform complex, difficult-to-vectorize images into cleaner, more conversion-friendly graphics by:
- Simplifying complex elements while maintaining the core visual identity
- Reducing noise and unnecessary details that cause problems during tracing
- Creating more defined edges and color boundaries that vectorize more cleanly
- Suggesting alternative visual approaches that might work better as SVG
By preparing images with PageOn.ai before conversion, I've been able to achieve much better results with even the most challenging source materials.
Practical Applications for Your Converted SVG Files
Now that you've successfully converted your PNG to SVG, let's explore the many ways you can leverage these vector files for maximum impact.
Implementing SVGs in Responsive Web Design
SVG files shine in responsive web environments. Here's how I implement them:
<!-- Basic SVG implementation -->
<img src="logo.svg" alt="Company Logo" width="200" height="80">
<!-- Inline SVG for more control -->
<svg width="200" height="80" viewBox="0 0 200 80" xmlns="http://www.w3.org/2000/svg">
  <!-- SVG content here -->
</svg>
<!-- Responsive SVG with CSS -->
<style>
.responsive-svg {
  width: 100%;
  max-width: 300px;
  height: auto;
}
</style>
<img class="responsive-svg" src="logo.svg" alt="Company Logo">
The key benefits of using SVGs in web design include:
- Perfect scaling at any screen size without pixelation
- Smaller file sizes for faster page loading
- Ability to modify colors and styles with CSS
- Better accessibility with proper ARIA attributes
- Support for animation and interactivity
Using SVGs in Presentation Software
SVGs are excellent for creating professional presentations. Here's how to use them effectively:
Google Slides
To import SVG into Google Slides, you'll need to use the Insert > Image > Upload from computer option. For best results, ensure your SVG is properly sized and optimized before importing.
Microsoft PowerPoint
PowerPoint offers better native SVG support. Use Insert > Pictures > This Device to add your SVG. Once imported, you can use the Graphics Tools tab to modify colors and effects.
Keynote
On Mac, Keynote has excellent SVG support. Simply drag and drop your SVG file into your presentation or use Insert > Choose to select your file.
SVG Animation Possibilities
Organizing Your SVG Library with PageOn.ai
As your collection of SVG assets grows, managing them becomes increasingly important. I've found PageOn.ai to be incredibly helpful for organizing and implementing my SVG library because it:
- Provides visual previews of all SVG assets in a searchable interface
- Allows for tagging and categorization of SVGs by project, style, or purpose
- Enables quick modification of SVG colors and basic properties without editing code
- Facilitates sharing SVG assets across team members with appropriate permissions
- Offers version control to track changes to frequently modified SVG files
- Integrates with common design and presentation tools for seamless workflows
By centralizing my SVG assets in PageOn.ai, I've been able to maintain consistency across projects and dramatically reduce the time spent searching for and adapting previously created vector graphics.
Beyond Basic Conversion: Enhancing Your SVGs
Once you've successfully converted your PNG to SVG, a world of possibilities opens up for customization and enhancement. Here are some advanced techniques I use to get the most out of my SVG files.
Editing SVG Code for Custom Modifications
One of the most powerful aspects of SVG is that it's XML-based and can be edited directly with a text editor. Here's a simple example of SVG code and how modifications affect the output:
<svg width="200" height="200" xmlns="http://www.w3.org/2000/svg">
  <!-- Original circle -->
  <circle cx="100" cy="100" r="80" fill="#FF8000" />
  <!-- Add a custom ID for targeting with CSS or JavaScript -->
  <path id="custom-path" d="M50,150 L150,50" stroke="#FFFFFF" stroke-width="5" />
  <!-- Add a group with multiple elements -->
  <g transform="translate(100,100)">
    <rect x="-25" y="-25" width="50" height="50" fill="#FFFFFF" />
  </g>
</svg>
Common code modifications I make include:
- Adding IDs and classes to elements for CSS styling and JavaScript interaction
- Optimizing path data for cleaner rendering and smaller file sizes
- Implementing reusable components with <defs> and <use> elements
- Adding metadata for better accessibility and search indexing
- Creating masks and clipping paths for complex visual effects
Adding Interactivity to SVG Elements
SVGs can be made interactive with CSS and JavaScript. Here's a simple example of hover effects:
<style>
  /* CSS hover effect */
  .interactive-element {
    transition: all 0.3s ease;
  }
  .interactive-element:hover {
    fill: #42A5F5;
    transform: scale(1.1);
  }
</style>
<svg width="200" height="200" xmlns="http://www.w3.org/2000/svg">
  <circle class="interactive-element" cx="100" cy="100" r="80" fill="#FF8000" />
</svg>
More advanced interactivity can be achieved with JavaScript:
<script>
  // Simple click interaction
  document.querySelector('.interactive-element').addEventListener('click', function() {
    this.setAttribute('fill', getRandomColor());
  });
  function getRandomColor() {
    const letters = '0123456789ABCDEF';
    let color = '#';
    for (let i = 0; i < 6; i++) {
      color += letters[Math.floor(Math.random() * 16)];
    }
    return color;
  }
</script>

Color Manipulation and Style Adjustments
One of the greatest advantages of SVG is the ability to change colors and styles without editing the original file. This can be done via CSS:
<style>
  /* Target specific elements by their class or ID */
    fill: var(--theme-color, #FF8000);
  }
  .accent-element {
    stroke: var(--accent-color, #42A5F5);
    stroke-width: 2px;
  }
  /* Theme switching */
  .dark-theme {
    --theme-color: #333333;
    --accent-color: #FFFFFF;
  }
  .light-theme {
    --theme-color: #FFFFFF;
    --accent-color: #333333;
  }
</style>
SVG Enhancement Techniques
Using PageOn.ai to Create Custom SVG Variations
PageOn.ai offers powerful tools for creating variations of your SVG files without needing to start from scratch each time. Here's how I use it to maximize the value of my vector assets:
- Color Theme Variations: Create multiple color schemes for the same SVG to match different brand contexts or seasonal campaigns
- Component Libraries: Break down complex SVGs into reusable components that can be mixed and matched for new designs
- Animation Presets: Save animation settings that can be quickly applied to different SVG elements
- Responsive Variants: Create simplified versions of complex SVGs for mobile display while maintaining the full detail for desktop
- Interactive Prototypes: Test different interaction patterns and visual feedback styles before implementing them in production
By leveraging PageOn.ai's capabilities, I can create an entire ecosystem of related SVG assets from a single source file, ensuring consistency while still allowing for creative variation and optimization for different contexts.
Transform Your Visual Expressions with PageOn.ai
Take your PNG to SVG conversions to the next level with powerful visualization tools that make creating, organizing, and implementing vector graphics effortless.
Start Creating with PageOn.ai TodayConclusion: Mastering PNG to SVG Conversion
Throughout this guide, I've shared my experience and insights on converting PNG files to SVG format. From understanding the fundamental differences between raster and vector graphics to exploring advanced enhancement techniques, we've covered the complete journey of transformation.
The key takeaways from this guide include:
- SVG files offer superior scalability, smaller file sizes, and greater editability compared to PNG files
- Multiple conversion options exist, from simple online tools to professional software solutions
- Understanding and adjusting conversion settings like color count and smoothness dramatically improves results
- Post-conversion optimization and enhancement can transform basic SVGs into powerful, interactive assets
- Proper organization and management of your SVG library maximizes their long-term value
Whether you're a designer looking to create more flexible assets, a developer aiming to improve web performance, or a content creator seeking professional-quality graphics, mastering PNG to SVG conversion opens up exciting possibilities for your projects.
As you continue your vector graphics journey, remember that tools like PageOn.ai can significantly streamline your workflow—from preparing images for optimal conversion to organizing your growing SVG library and creating custom variations that meet your specific needs. With the right approach and tools, you'll be creating stunning, scalable vector graphics in no time.
You Might Also Like
Strategic Infographic Planning: Transform Complex Ideas into Visual Narratives | PageOn.ai
Master strategic content planning for infographics that tell clear visual stories. Learn frameworks, data visualization strategies, and design elements that transform complex ideas into engaging narratives.
Visualizing the CIA Triad: A Modern Framework for Cybersecurity Success
Discover how the CIA triad (Confidentiality, Integrity, Availability) forms the foundation of modern cybersecurity. Learn implementation strategies and visualization techniques for security success.
Transforming Industries with Language Models: From Summarization to Question Answering
Explore practical applications of language models from text summarization to question answering systems. Learn how LLMs are transforming healthcare, finance, e-commerce and more with PageOn.ai.
PDR Security Framework: Visualizing Protection, Detection & Response Systems
Explore the PDR Security Framework with visual guides to Protection, Detection, and Response systems. Learn implementation strategies with interactive diagrams and actionable insights.