Supabase Authentication Setup Guide
A Visual Implementation Guide for Modern Web Applications
Discover how to implement a secure, scalable authentication system using Supabase's powerful features. This guide walks you through setup, configuration, and best practices with visual workflows and code examples.
Introduction to Supabase Authentication
Authentication is the foundation of modern web applications, serving as the gateway to personalized experiences and secure data access. Yet, implementing a robust authentication system has traditionally been one of the most challenging aspects of web development, often becoming a bottleneck that delays project timelines.
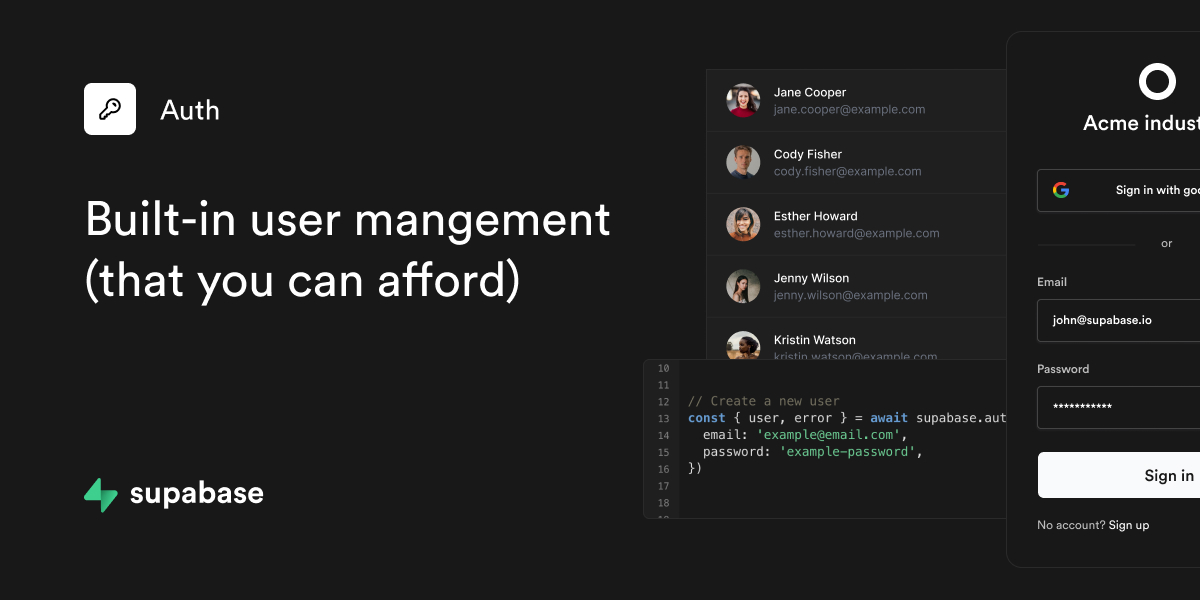
Supabase's intuitive authentication dashboard provides visual management of users and settings
The Authentication Challenge
I've seen many projects stall at the authentication phase. The complexity isn't just in the implementation but in visualizing how all the pieces fit together. Developers often struggle to create mental models of:
- How user credentials flow through the system
- Where and how session state is maintained
- How authentication connects to authorization
- How to properly secure sensitive operations
The Supabase Authentication Advantage
Supabase addresses these challenges by providing a comprehensive authentication solution built on PostgreSQL and JWT tokens. What makes it particularly powerful is its visual-first approach to authentication management.
Key Advantage: Supabase combines the security of PostgreSQL with the simplicity of a visual dashboard, making complex authentication workflows accessible to developers of all experience levels.
flowchart TD
    A[User Signup/Login] -->|Credentials| B[Supabase Auth API]
    B -->|Validate| C[PostgreSQL auth.users]
    B -->|Issue| D[JWT Token]
    D -->|Store| E[Client Storage]
    D -->|Authorize| F[Database Access]
    D -->|Authorize| G[Storage Access]
    D -->|Authorize| H[Edge Functions]
    classDef primary fill:#FF8000,stroke:#333,stroke-width:1px,color:white;
    class B,C,D primary;
In this guide, I'll walk you through setting up Supabase Authentication for your web application, with special emphasis on visualizing the process to build a clear mental model of how authentication works.
Visualizing Authentication Architecture
Before diving into implementation details, it's crucial to understand the architecture of Supabase Authentication. This visual understanding will serve as a foundation for all the decisions you'll make during setup and configuration.
The Authentication Flow Blueprint

Complete authentication flow from signup to authenticated state
The authentication flow in Supabase follows a standard pattern but with some unique characteristics:
sequenceDiagram
    participant User
    participant Client
    participant SupabaseAuth
    participant Database
    User->>Client: Enter Credentials
    Client->>SupabaseAuth: signUp() or signIn()
    SupabaseAuth->>Database: Verify/Create User
    Database->>SupabaseAuth: User Data
    SupabaseAuth->>SupabaseAuth: Generate JWT
    SupabaseAuth->>Client: Return JWT + User
    Client->>Client: Store JWT
    Note over Client,SupabaseAuth: Authenticated State
    Client->>SupabaseAuth: API Request with JWT
    SupabaseAuth->>SupabaseAuth: Verify JWT
    SupabaseAuth->>Database: Query (with RLS)
    Database->>SupabaseAuth: Filtered Results
    SupabaseAuth->>Client: Return Data
Core Components of Supabase Auth
Authentication Providers
- Email/Password
- Magic Link (Passwordless)
- Phone Authentication
- OAuth (Social Logins)
- Single Sign-On (Enterprise)
Database Schema
- auth.users (Core user table)
- auth.identities (Provider links)
- auth.sessions (Active sessions)
- auth.refresh_tokens (For session renewal)
JWT Token Structure
Understanding the JWT token structure is crucial for implementing proper authorization. Supabase JWTs contain important claims that you'll use for access control:
{
  "aud": "authenticated",
  "exp": 1714509871,
  "sub": "user-uuid-here",
  "email": "[email protected]",
  "role": "authenticated",
  "app_metadata": {
    "provider": "email"
  },
  "user_metadata": {
    "name": "John Doe"
  }
}
With this architectural understanding in place, let's move on to setting up your authentication foundation.
Setting Up Your Authentication Foundation
Now that we understand the architecture, let's set up the foundation for Supabase Authentication in your web application.
Project Configuration and Environment
The first step is to create a Supabase project and configure your development environment:

Creating a new Supabase project through the dashboard interface
- Create a Supabase project at app.supabase.com
-
Install the Supabase client library in your application:
npm install @supabase/supabase-js -
Initialize the Supabase client in your application:
import { createClient } from '@supabase/supabase-js' const supabaseUrl = process.env.NEXT_PUBLIC_SUPABASE_URL const supabaseAnonKey = process.env.NEXT_PUBLIC_SUPABASE_ANON_KEY export const supabase = createClient(supabaseUrl, supabaseAnonKey) -
Set up environment variables in your project:
NEXT_PUBLIC_SUPABASE_URL=https://your-project-id.supabase.co
NEXT_PUBLIC_SUPABASE_ANON_KEY=your-anon-key
Authentication Provider Selection
Supabase offers multiple authentication methods. Let's visualize the options and implementation requirements:
Email/Password Authentication
This is the most traditional approach and requires minimal setup in Supabase:
// Sign up with email and password
const { data, error } = await supabase.auth.signUp({
  email: '[email protected]',
  password: 'example-password',
})
// Sign in with email and password
const { data, error } = await supabase.auth.signInWithPassword({
  email: '[email protected]',
  password: 'example-password',
})
Magic Link Authentication
Passwordless authentication using email links:
const { data, error } = await supabase.auth.signInWithOtp({
  email: '[email protected]',
})
Social Login Integration
Enable authentication through popular platforms like Google, GitHub, and more:

Configuring social login providers in the Supabase dashboard
const { data, error } = await supabase.auth.signInWithOAuth({
  provider: 'google',
  options: {
    redirectTo: 'https://example.com/callback',
  }
})
Pro Tip: When implementing social login, always set up proper redirect URLs in both the Supabase dashboard and the OAuth provider's developer console. Mismatched redirect URLs are a common source of authentication errors.
Building Visual Authentication Interfaces
The user interface is a critical component of the authentication experience. Well-designed authentication interfaces not only improve security but also enhance user satisfaction and conversion rates.
Sign-Up Experience Design
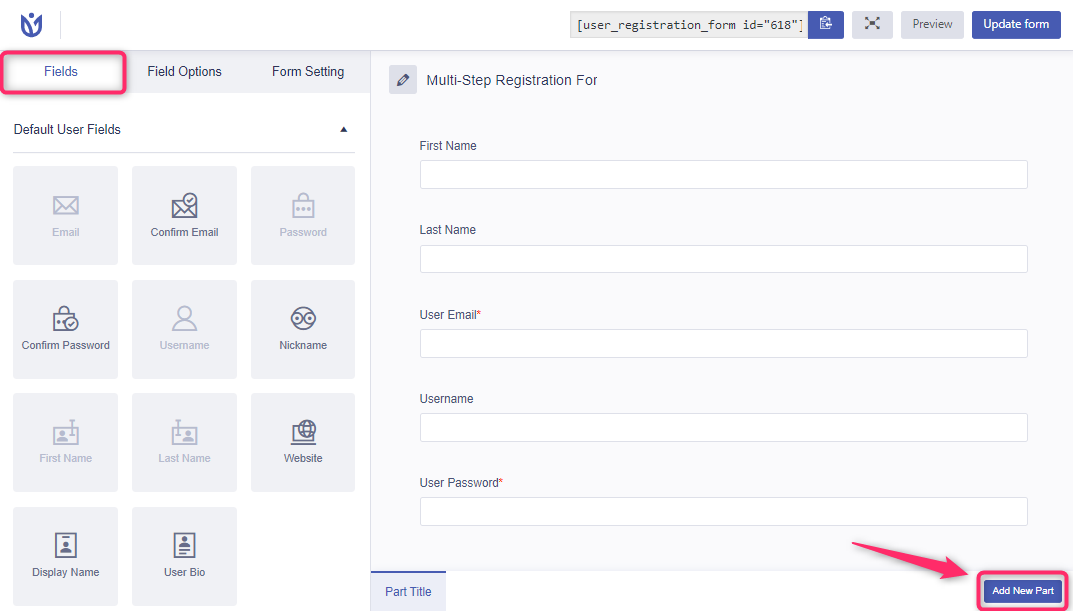
Multi-step registration form with progress indicators enhances user experience
When designing your sign-up experience, consider these key elements:
- Form validation - Provide real-time feedback on password strength and field requirements
- Progressive disclosure - Break complex forms into logical steps
- Visual cues - Use icons and colors to guide users through the process
- Error handling - Display clear, actionable error messages
Here's an example of a React component for a sign-up form with real-time validation:
import { useState } from 'react'
import { supabase } from '../lib/supabaseClient'
export default function SignUp() {
  const [loading, setLoading] = useState(false)
  const [email, setEmail] = useState('')
  const [password, setPassword] = useState('')
  const [error, setError] = useState(null)
  const handleSignUp = async (e) => {
    e.preventDefault()
    setLoading(true)
    setError(null)
    const { data, error } = await supabase.auth.signUp({
      email,
      password,
    })
    setLoading(false)
    if (error) setError(error.message)
  }
  return (
)
}
Login Flow Optimization
The login flow should be as frictionless as possible while maintaining security:
flowchart TD
    A[User Arrives] --> B{Has Account?}
    B -->|Yes| C[Login Form]
    B -->|No| D[Sign Up Form]
    C --> E{Valid Credentials?}
    E -->|Yes| F[Redirect to App]
    E -->|No| G[Show Error]
    G --> C
    D --> H[Account Creation]
    H --> I{Email Verification?}
    I -->|Yes| J[Send Verification]
    I -->|No| F
    J --> K[Show Instructions]
    K --> F
Consider implementing these login flow optimizations:
- Remember me functionality for trusted devices
- Social login buttons with proper branding and positioning
- Password recovery workflows that are simple and secure
- Device recognition to reduce friction for returning users

Login interface with social login options and password recovery
Session Management Visualization
Effective session management includes both technical implementation and visual cues for users:
Technical Implementation
// Check for existing session
const { data: { session } } = await supabase.auth.getSession()
// Listen for auth changes
supabase.auth.onAuthStateChange((event, session) => {
  if (event === 'SIGNED_IN') {
    // Update UI for authenticated state
  } else if (event === 'SIGNED_OUT') {
    // Update UI for unauthenticated state
  }
})
Visual Indicators
- User avatar or initials in navigation
- Session timeout warnings
- Activity status indicators
- Login status across multiple tabs
Use secure visual indicators that can't be easily spoofed by malicious sites.
Using PageOn.ai, you can create interactive visualizations that help your team understand the session lifecycle:
stateDiagram-v2
    [*] --> Unauthenticated
    Unauthenticated --> Authenticating: Login Attempt
    Authenticating --> Authenticated: Success
    Authenticating --> Unauthenticated: Failure
    Authenticated --> SessionActive
    SessionActive --> SessionRefreshing: Token Expiring
    SessionRefreshing --> SessionActive: Refresh Success
    SessionRefreshing --> Unauthenticated: Refresh Failure
    SessionActive --> Unauthenticated: Logout
    SessionActive --> SessionInactive: Inactivity
    SessionInactive --> SessionActive: User Activity
    SessionInactive --> Unauthenticated: Timeout
Securing Your Application with Row Level Security
One of Supabase's most powerful features is its integration with PostgreSQL's Row Level Security (RLS). This allows you to define security policies that control which rows a user can access in your database tables.
Data Access Control Visualization

Visualization of how RLS policies filter data based on user context
RLS works by adding a filter condition to queries that access your tables. These conditions are evaluated against the current user's context, which is provided by the JWT token from Supabase Auth.
RLS Policy Implementation
Let's implement some common RLS policies for a typical application:
-- Enable RLS on the profiles table
ALTER TABLE profiles ENABLE ROW LEVEL SECURITY;
-- Allow users to see only their own profile
CREATE POLICY "Users can view own profile"
ON profiles FOR SELECT
USING (auth.uid() = id);
-- Allow users to update only their own profile
CREATE POLICY "Users can update own profile"
ON profiles FOR UPDATE
USING (auth.uid() = id);
-- Enable RLS on the posts table
ALTER TABLE posts ENABLE ROW LEVEL SECURITY;
-- Users can read all published posts
CREATE POLICY "Anyone can view published posts"
ON posts FOR SELECT
USING (published = true);
-- Users can read their own drafts
CREATE POLICY "Users can view own drafts"
ON posts FOR SELECT
USING (author_id = auth.uid() AND published = false);
-- Users can insert their own posts
CREATE POLICY "Users can create own posts"
ON posts FOR INSERT
WITH CHECK (author_id = auth.uid());
-- Users can update their own posts
CREATE POLICY "Users can update own posts"
ON posts FOR UPDATE
USING (author_id = auth.uid());
These policies ensure that users can only access data they're authorized to see, even if they have direct access to your API endpoints.
Using PageOn.ai to Design Security Workflows
Security concepts can be complex and hard to visualize. PageOn.ai's visualization tools can help you create clear diagrams that communicate your security model to the entire team:
flowchart TD
    A[Client Request] --> B{Authentication}
    B -->|Valid JWT| C{Authorization}
    B -->|Invalid/No JWT| D[401 Unauthorized]
    C -->|RLS Allows| E[Data Access]
    C -->|RLS Denies| F[403 Forbidden]
    E --> G[Return Results]
Security Best Practice: Always test your RLS policies thoroughly. A common mistake is to focus only on the "happy path" and forget to test what happens when users attempt to access unauthorized data.
Advanced Authentication Patterns
As your application grows, you may need to implement more advanced authentication patterns to enhance security and user experience.
Multi-Factor Authentication Implementation

Multi-factor authentication setup interface with QR code for TOTP
Implementing MFA with Supabase requires a few additional steps:
- Enable MFA in your Supabase project settings
-
Implement the enrollment flow for users to set up MFA:
// Enroll a new factor (TOTP) const { data, error } = await supabase.auth.mfa.enroll({ factorType: 'totp' }) // data contains: // { // id: 'factor-id', // type: 'totp', // totp: { // qr_code: 'data:image/png;base64,...', // secret: 'JBSWY3DPEHPK3PXP', // uri: 'otpauth://totp/...' // } // } -
Verify the factor after the user sets it up:
// Verify the factor with a code from the authenticator app const { data, error } = await supabase.auth.mfa.challenge({ factorId: 'factor-id' }) // Verify the challenge const { data, error } = await supabase.auth.mfa.verify({ factorId: 'factor-id', challengeId: data.id, code: '123456' // Code from authenticator app }) -
Implement the challenge flow during login:
// First, sign in with password
const { data, error } = await supabase.auth.signInWithPassword({
  email: '[email protected]',
  password: 'example-password',
})
// Then challenge MFA if required
if (data?.session?.user?.factors) {
  // Challenge the first factor
  const factorId = data.session.user.factors[0].id
  const { data: challengeData } = await supabase.auth.mfa.challenge({
    factorId
  })
  // Verify with user-provided code
  const { data } = await supabase.auth.mfa.verify({
    factorId,
    challengeId: challengeData.id,
    code: '123456' // Code from user input
  })
}
sequenceDiagram
    participant User
    participant App
    participant Supabase
    User->>App: Sign in with password
    App->>Supabase: signInWithPassword()
    Supabase->>App: Return session with MFA required
    App->>User: Prompt for MFA code
    User->>App: Enter code from authenticator
    App->>Supabase: mfa.verify()
    Supabase->>App: Return complete session
    App->>User: Complete login
Enterprise Authentication Integration
For enterprise applications, you may need to implement SSO with corporate identity providers:
.png)
Enterprise SSO configuration interface for SAML and OIDC providers
Supabase supports enterprise SSO through providers like Auth0, Okta, and Azure AD. The implementation typically involves:
- Configure the identity provider with your Supabase project details
- Set up the SSO provider in your Supabase dashboard
- Implement the sign-in flow in your application
// Sign in with SSO
const { data, error } = await supabase.auth.signInWithSSO({
  domain: 'example.com',
  redirectTo: 'https://example.com/callback'
})
Custom Claims and User Metadata
Supabase allows you to store custom metadata with user accounts, which can be used for roles, permissions, and personalization:
During Sign-Up
// Add metadata during sign-up
const { data, error } = await supabase.auth.signUp({
  email: '[email protected]',
  password: 'example-password',
  options: {
    data: {
      first_name: 'John',
      last_name: 'Doe',
      role: 'customer',
      plan: 'free'
    }
  }
})
Updating Metadata
// Update user metadata
const { data, error } = await supabase.auth.updateUser({
  data: {
    plan: 'premium',
    subscription_id: 'sub_123456',
    has_completed_onboarding: true
  }
})
You can then use this metadata in your RLS policies to control access based on user attributes:
-- Allow premium users to access premium content
CREATE POLICY "Premium content for premium users"
ON premium_content FOR SELECT
USING (
  auth.jwt() ->> 'user_metadata' ? 'plan'
  AND
  auth.jwt() -> 'user_metadata' ->> 'plan' = 'premium'
);
Important: User metadata is stored in the JWT token and is accessible to the client. Don't store sensitive information here. For sensitive data, use a separate table with appropriate RLS policies.
Real-time Authentication Features
Supabase's real-time capabilities can enhance your authentication system with features like presence indicators and live updates.
Presence and Online Status
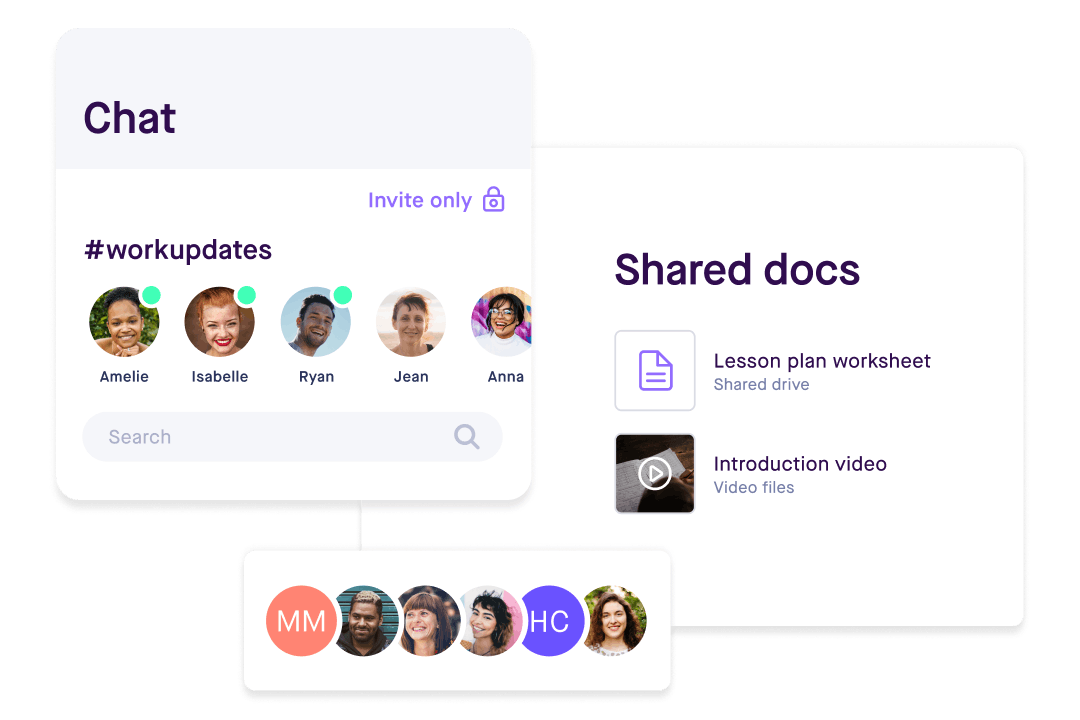
User interface showing real-time presence indicators for team members
Implementing presence with Supabase Realtime:
// Initialize a Realtime presence channel
const channel = supabase.channel('online-users')
// Track presence for the current user
channel
  .on('presence', { event: 'sync' }, () => {
    const newState = channel.presenceState()
    // Update your UI with the new state
    updatePresenceUI(newState)
  })
  .on('presence', { event: 'join' }, ({ key, newPresences }) => {
    // Handle users joining
    console.log('Users joined:', newPresences)
  })
  .on('presence', { event: 'leave' }, ({ key, leftPresences }) => {
    // Handle users leaving
    console.log('Users left:', leftPresences)
  })
  .subscribe(async (status) => {
    if (status === 'SUBSCRIBED') {
      // Send presence when successfully subscribed
      await channel.track({
        user_id: user.id,
        online_at: new Date().toISOString(),
      })
    }
  })
Subscription-Based Access Control
For SaaS applications, you can implement subscription-based access control by combining Supabase Auth with payment providers like Stripe:
flowchart TD
    A[User Signs Up] --> B[Create Supabase Auth User]
    B --> C[Create Customer in Stripe]
    C --> D[Store Customer ID in User Metadata]
    D --> E[User Selects Plan]
    E --> F[Create Subscription in Stripe]
    F --> G[Webhook: Subscription Created]
    G --> H[Update User Metadata with Plan]
    H --> I[Update RLS Policies]
    I --> J{Access Content}
    J -->|Premium User| K[Access Premium Content]
    J -->|Free User| L[Access Free Content]
This flow ensures that users only have access to content appropriate for their subscription level.
Pro Tip: Use PageOn.ai's visualization tools to map out your subscription tiers and associated permissions. This makes it easier to communicate the value proposition to users and ensures your team understands the access control requirements.
Testing and Debugging Authentication
Thorough testing is crucial for authentication systems. A single bug can lead to security vulnerabilities or frustrated users.
Authentication Testing Strategies
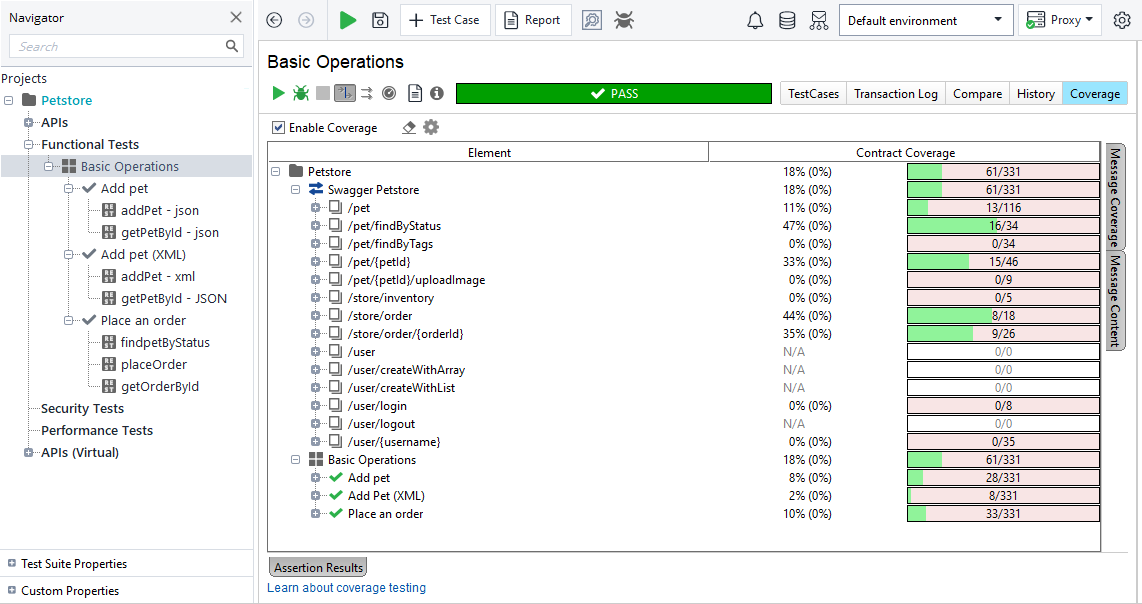
Authentication test coverage dashboard showing security gaps
Implement these testing strategies for your authentication system:
Unit Tests
- Form validation logic
- UI state management
- Error handling
test('shows error with invalid email', () => {
render(
Integration Tests
- Complete auth flows
- Token handling
- Redirect behavior
test('successful login redirects to dashboard', async () => {
// Mock Supabase response
mockSupabaseSignIn.mockResolvedValue({
data: { user: { id: '123' } },
error: null
})
render(
Additionally, implement end-to-end testing for critical flows:
// Using Cypress for E2E testing
describe('Authentication', () => {
  it('allows a user to sign up and log in', () => {
    // Visit signup page
    cy.visit('/signup')
    // Fill out the form
    cy.get('input[name=email]').type('[email protected]')
    cy.get('input[name=password]').type('securepassword')
    cy.get('button[type=submit]').click()
    // Verify email confirmation page
    cy.contains('Check your email').should('be.visible')
    // Simulate email confirmation (using test hooks)
    cy.task('confirmUserEmail', '[email protected]')
    // Try logging in
    cy.visit('/login')
    cy.get('input[name=email]').type('[email protected]')
    cy.get('input[name=password]').type('securepassword')
    cy.get('button[type=submit]').click()
    // Verify successful login
    cy.url().should('include', '/dashboard')
    cy.contains('Welcome').should('be.visible')
  })
})
Debugging Authentication Issues
When authentication problems arise, having the right debugging tools can save hours of frustration:
Common Issues
- Expired tokens
- CORS configuration errors
- Mismatched redirect URLs
- RLS policy conflicts
- JWT payload size limits
Debugging Tools
- Browser DevTools Network tab
- JWT debuggers (jwt.io)
- Supabase dashboard logs
- Custom auth state loggers
Create a simple auth debugging component to help diagnose issues:
// AuthDebug.jsx - Only include in development builds
import { useEffect, useState } from 'react'
import { supabase } from '../lib/supabaseClient'
export function AuthDebug() {
  const [debug, setDebug] = useState({
    session: null,
    error: null,
    lastEvent: null
  })
  useEffect(() => {
    // Get current session
    const getSession = async () => {
      const { data, error } = await supabase.auth.getSession()
      setDebug(d => ({ ...d, session: data.session, error }))
    }
    getSession()
    // Listen for auth events
    const { data } = supabase.auth.onAuthStateChange((event, session) => {
      console.log('Auth event:', event, session)
      setDebug(d => ({ ...d, lastEvent: event, session }))
    })
    return () => {
      data?.subscription?.unsubscribe()
    }
  }, [])
  // Only render in development
  if (process.env.NODE_ENV !== 'development') return null
  return (

      Auth Debug

        Status: {debug.session ? 'Authenticated' : 'Not authenticated'}


        Last event: {debug.lastEvent || 'None'}

      {debug.error && (

          Error: {debug.error.message}

      )}

        Session details
        {JSON.stringify(debug.session, null, 2)}


  )
}
Production Deployment and Monitoring
Deploying your authentication system to production requires careful planning and ongoing monitoring.
Secure Deployment Practices
Security operations center monitoring authentication activity
Follow these best practices when deploying your authentication system to production:
- Environment-specific configuration - Use different settings for development, staging, and production
- Secure environment variables - Never commit secrets to your repository
- CORS configuration - Restrict allowed origins to your application domains
- Security headers - Implement Content-Security-Policy, X-Frame-Options, etc.
- Rate limiting - Protect authentication endpoints from brute force attacks
Configure your production environment with appropriate security headers:
// For Next.js applications, in next.config.js
module.exports = {
  async headers() {
    return [
      {
        source: '/(.*)',
        headers: [
          {
            key: 'Content-Security-Policy',
            value: "default-src 'self'; script-src 'self' 'unsafe-inline' 'unsafe-eval'; style-src 'self' 'unsafe-inline'; img-src 'self' data: blob:; font-src 'self'; connect-src 'self' https://your-project-id.supabase.co"
          },
          {
            key: 'X-Frame-Options',
            value: 'DENY'
          },
          {
            key: 'X-Content-Type-Options',
            value: 'nosniff'
          },
          {
            key: 'Referrer-Policy',
            value: 'origin-when-cross-origin'
          },
          {
            key: 'Permissions-Policy',
            value: 'camera=(), microphone=(), geolocation=()'
          }
        ]
      }
    ]
  }
}
Authentication Analytics and Monitoring
Monitor your authentication system to detect issues and security threats:
Implement these monitoring practices:
- Track authentication metrics - Success rates, failure rates, sign-up conversion
- Set up alerts - Unusual activity, high failure rates, geographic anomalies
- Log authentication events - Store logs securely for auditing and troubleshooting
- Monitor session usage - Track active sessions and detect suspicious behavior
Security Tip: Implement a security operations center approach to monitor authentication activity. Set up alerts for unusual patterns like multiple failed login attempts or logins from unexpected locations.
Future-Proofing Your Authentication System
Authentication standards and user expectations evolve over time. Plan for the future to ensure your system remains secure and user-friendly.
Scaling Authentication for Growth

Scalable authentication architecture with distributed caching
As your user base grows, consider these scaling strategies:
- Implement caching - Cache frequently used user data and session information
- Optimize database queries - Use indexes and efficient query patterns
- Consider regional deployments - Reduce latency for global users
- Monitor performance metrics - Track authentication response times and error rates
Evolving Authentication Requirements
Stay ahead of the curve by planning for emerging authentication trends:
flowchart LR
    A[Traditional Password] --> B[Passwordless]
    B --> C[Biometric]
    C --> D[Decentralized Identity]
    E[Single-Factor] --> F[Two-Factor]
    F --> G[Multi-Factor]
    G --> H[Continuous Authentication]
    I[Centralized] --> J[Federated]
    J --> K[Self-Sovereign]
Consider implementing these modern authentication approaches:
Passwordless Authentication
Eliminate password-related vulnerabilities by using magic links, one-time codes, or WebAuthn.
// Magic link authentication
const { data, error } = await supabase.auth.signInWithOtp({
  email: '[email protected]'
})
Biometric Authentication
Leverage WebAuthn for secure, convenient authentication using fingerprints or facial recognition.
// WebAuthn authentication
// Requires additional setup with WebAuthn libraries
const { data, error } = await supabase.auth.signInWithPassword({
  email,
  password,
  options: {
    captchaToken: webAuthnToken
  }
})
Using PageOn.ai to Document Authentication Evolution
As your authentication system evolves, maintain clear documentation using PageOn.ai's visualization tools:
- Create living documentation that evolves with your system
- Build visual onboarding guides for new developers
- Maintain architecture diagrams that reflect the current state
- Visualize authentication flows for different user types and scenarios

Interactive authentication flow documentation created with PageOn.ai
Transform Your Authentication Visualization
Ready to create stunning visual documentation for your authentication system? PageOn.ai helps you communicate complex security concepts with clarity and precision.
Start Creating with PageOn.ai TodayYou Might Also Like
Mastering Your Inner Landscape: Building Personal Power Through Boundaries and Self-Awareness
Discover how to build personal power through effective boundary-setting and self-awareness. Learn practical visualization techniques to transform your relationships and achieve authentic growth.
Five Core Primitives That Power Modern AI Connectivity - Visual Guide
Explore the fundamental building blocks enabling modern AI systems to communicate: memory stores, context management, tool APIs, data movement, and agent coordination primitives visualized.
Strategic Contrast in E-Learning: Creating Visual Impact That Enhances Learning Outcomes
Discover how to leverage strategic contrast in e-learning design to reduce cognitive load, improve retention, and create visually impactful learning experiences that drive better outcomes.
Vibe Coding: Transforming Ideas into Working Software Through Natural Language
Discover how vibe coding revolutionizes software development by using natural language to create working code. Learn the mechanics, workflow, and future of this AI-powered approach.